Skip to content

EDU-17893: Update CMS integration instructions - #2570

Merged
mariana-caetano merged 20 commits into
mainfrom
EDU-17893
May 18, 2026
Merged

mariana-caetano merged 20 commits into
mainfrom
EDU-17893

Conversation

@mariana-caetano

Copy link
Copy Markdown
Contributor

Summary

Provide a concise description of the change introduced by this PR.
Example: “Updates the Checkout overview to include new webhook behavior.”


Type of change

  • New content — Adds new documentation.
  • Content update — Improves existing documentation (clarity, structure, examples, accuracy).
  • Bug fix — Fixes markdown issues.
  • Editorial fix — Spelling, grammar, or minor copy edits that don’t change meaning.
  • Content removal — Deletes deprecated or obsolete content.

Checklist

  • The content follows the VTEX Style Guide.
  • Markdown renders correctly (headings, lists, tables, callouts).
  • Links, images, code blocks, and examples are valid.
  • Terminology, product names, and API references are consistent.
  • Frontmatter (title, description, tags, slug) is correct
  • Files follow the expected folder structure and naming conventions.

@mariana-caetano mariana-caetano self-assigned this Mar 27, 2026
@github-actions

Copy link
Copy Markdown
Contributor

🏷️ Frontmatter errors

docs/faststore/docs/getting-started/webops/dashboard.mdx

Field issues

Field Error
updatedAt 'updatedAt' must be in ISO 8601 format (YYYY-MM-DDThh:mm:ss.sssZ).

@github-actions

github-actions Bot commented Mar 27, 2026 •

Copy link
Copy Markdown
Contributor

👁️‍🗨️ Preview changes on Developer Portal

You can use the link below to load the Developer Portal in preview mode with the changes from this branch:

👉 Open preview environment

Below is the list of modified pages and their corresponding preview URLs:

File Preview URL Sidebar
docs/faststore/docs/getting-started/1-setting-up-your-environment.mdx https://developers.vtex.com/docs/guides/faststore/getting-started-1-setting-up-your-environment ⚠️ Missing from navigation.json
docs/faststore/docs/getting-started/2-starting-the-project.mdx https://developers.vtex.com/docs/guides/faststore/getting-started-2-starting-the-project ⚠️ Missing from navigation.json
docs/faststore/docs/getting-started/3-running-the-project-locally.mdx https://developers.vtex.com/docs/guides/faststore/getting-started-3-running-the-project-locally ⚠️ Missing from navigation.json
docs/faststore/docs/getting-started/glossary.mdx https://developers.vtex.com/docs/guides/faststore/getting-started-glossary ⚠️ Missing from navigation.json
docs/faststore/docs/getting-started/overview.mdx https://developers.vtex.com/docs/guides/faststore/getting-started-overview ⚠️ Missing from navigation.json
docs/faststore/docs/getting-started/webops/dashboard.mdx https://developers.vtex.com/docs/guides/faststore/webops-dashboard ⚠️ Missing from navigation.json

@github-actions

github-actions Bot commented Mar 27, 2026 •

Copy link
Copy Markdown
Contributor

🔍 Documentation feedback for docs/faststore/docs/getting-started/1-setting-up-your-environment.mdx

1. General Feedback:
The guide provides a clear and comprehensive set of instructions for setting up a FastStore development environment. The content is informative and generally well-structured. However, it deviates from the specified rules in several key areas, particularly regarding the frontmatter title format, the mandatory Before you begin and Instructions section headings, the heading levels for individual steps, and consistent use of imperative verbs at the start of instructions. There are also a few instances of passive voice that could be improved for directness.

2. Actionable Feedback:

  1. Frontmatter title: The title includes a numerical prefix ("1.") which should be removed.
    • Correction: Change title: "1. Setting up your environment" to title: "Setting up your environment".
  2. Missing Before you begin Section (R1.1): The guide lacks an explicit ## Before you begin section. The current introductory paragraph and the warning note (>❗️) contain prerequisite information that should be housed under this dedicated heading.
    • Correction: Add a ## Before you begin section and move the relevant introductory and warning content into it.
  3. Missing Instructions Section Heading (R1.1): The guide jumps directly from the introduction to ## Step 1. All individual steps should be nested under a main ## Instructions heading.
    • Correction: Add a ## Instructions heading before ### Step 1 - Install the VTEX IO CLI.
  4. Incorrect Step Heading Level: All main step headings (## Step N - Imperative title) use an incorrect heading level. The rule specifies ### Step N - Imperative title for subsections.
    • Correction: Change all ## Step N - Imperative title headings to ### Step N - Imperative title.
  5. R2.5 - Imperative Verb for Step 1: The content under ### Step 1 - Installing the VTEX IO CLI is descriptive rather than an imperative instruction.
    • Correction: Rephrase the content to start with an imperative verb, e.g., "Install the [VTEX IO CLI]... by following [this guide]...".
  6. R2.5 - Imperative Verb for Step 5.3: The instruction "A confirmation message will appear. Type y to proceed." does not start with an imperative verb.
    • Correction: Rephrase to "When prompted for confirmation, type y to proceed."
  7. R2.3 - Passive Voice: Several sentences use passive voice, which can be rephrased to active voice for better clarity and directness.
    • Example 1: "The [VTEX IO CLI]... is the command-line interface used to manage your VTEX projects."
      • Correction: "The [VTEX IO CLI]... manages your VTEX projects."
    • Example 2 (in details block): "If your account is using the vtex.edition-store@5.x major version, the VTEX Intelligent Search app is already included..."
      • Correction: "If your account uses the vtex.edition-store@5.x major version, it already includes the VTEX Intelligent Search app..."
    • Example 3: "The FastStore WebOps app has been successfully installed."
      • Correction: "You have successfully installed the FastStore WebOps app."
  8. Internal Link Update: The internal link for "next step" in ### Step 2 needs to be updated to reflect the corrected heading slug for ### Step 3.
    • Correction: Change [next step](#step-3-installing-cms-plugin) to [next step](#step-3---install-the-cms-plugin).

3. Suggested Revision:

---
title: "Setting up your environment"
excerpt: "Prepare your account and local setup to start developing with FastStore."
createdAt: "2024-06-03T11:30:00.813Z"
updatedAt: "2026-03-27T10:00:00.813Z"
---

In this guide, you’ll prepare your local environment and VTEX account to ensure reliable onboarding, builds, and CMS synchronization.

## Before you begin

>❗️ Skipping these prerequisites can lead to failed installations, duplicated content during onboarding, or local development errors.

## Instructions

### Step 1 - Install the VTEX IO CLI

Install the [VTEX IO CLI](https://developers.vtex.com/vtex-developer-docs/docs/vtex-io-documentation-vtex-io-cli-installation-and-command-reference) on your machine by following [this guide](https://developers.vtex.com/vtex-developer-docs/docs/vtex-io-documentation-vtex-io-cli-installation-and-command-reference). The VTEX IO CLI manages your VTEX projects.

### Step 2 - Install CMS and its dependencies

[CMS](https://developers.vtex.com/docs/guides/cms-for-faststore-storefronts) is the native VTEX content management solution for FastStore projects. Before proceeding, ensure the `vtex.admin-content-platform-ui` app is installed in your account to avoid build errors or duplicated content.

To check whether you have it installed, follow the instructions below:

1.  Open the terminal and log in to your account using the following command. Replace `{accountName}` with your VTEX account name.

    ```bash
    vtex login {accountName}
    ```

2.  Run `vtex ls` to list all the installed apps in your account.
3.  Check if `vtex.admin-content-platform-ui` is in the list. If so, proceed to the [next step](#step-3---install-the-cms-plugin). Otherwise, follow these instructions.

4.  After logging into your account, install `vtex.admin-content-platform-ui` by running the following command:

    ```bash
    vtex install vtex.admin-content-platform-ui
    ```

    A success message will confirm the installation:

    ```bash
    $ vtex install vtex.admin-content-platform-ui
    √ Are you sure you want to force this operation on the master workspace on the account mystore? ... yes
    11:25:04.132 - warn: Using master workspace. I hope you know what you're doing. 💥
    11:25:11.276 - info: Installed app vtex.admin-content-platform-ui successfully  
    ```

### Step 3 - Install the CMS plugin

To use the CMS through the CLI, install its plugin:

1.  Open the terminal and log in to your VTEX account using the VTEX IO CLI. Replace `accountName` with your VTEX account name.

    ```bash
    vtex login {accountName}
    ```

2.  Install the CMS plugin:

    ```bash
    vtex plugins install @vtex/cli-plugin-content
    ```

3.  Verify the installation by running the following command:

    ```bash
    vtex content
    ```

    If the installation is successful, you should see the following output:

    ```bash
    $ vtex content
    Generate a single schema file for CMS

    USAGE
    $ vtex content COMMAND

    COMMANDS
    content generate-schema      Generate a single schema file for CMS
    content init                 Initialize CMS folder structure with example files.
    content split-components     Split CMS component files from sections.json
    content split-content-types  Split CMS content-type files from content-types.json        
    content upload-schema        Upload a local schema to Schema Registry.
    ```

### Step 4 - Enable the VTEX Intelligent Search app

The [VTEX Intelligent Search](https://help.vtex.com/tracks/vtex-intelligent-search) app enhances the user experience by providing accurate and personalized search results throughout the shopping journey.
Before developing a storefront in FastStore, you need to enable the app in your account. For more information about Intelligent Search and its integration, please refer to the [VTEX Intelligent Search](https://help.vtex.com/tracks/vtex-intelligent-search) and [Integration Settings](https://help.vtex.com/en/tracks/vtex-intelligent-search--19wrbB7nEQcmwzDPl1l4Cb/6wKQgKmu2FT6084BJT7z5V) guides.

To enable the app, check which version of the [Edition App](https://developers.vtex.com/docs/guides/vtex-io-documentation-edition-app) is installed in your account.

Based on the edition version, follow the instructions below.

> ℹ️ To confirm which Edition App version is installed in your account, open the terminal and use the VTEX IO CLI. Log in to your account by running `vtex login {accountName}` and run `vtex edition get` to see the Edition App version installed in the current account.

<details>
<summary><b>Accounts using the `vtex.edition-store@5.x`</b></summary>

If your account uses the `vtex.edition-store@5.x` major version, it already includes the VTEX Intelligent Search app, and you must integrate it via VTEX Admin.

To integrate VTEX Intelligent Search, go to the VTEX Admin, access **Store Settings > Intelligent Search > Integrations**, and click `START INTEGRATION`.

</details>

<details>
<summary><b>Accounts using an edition version below `5.x`</b></summary>

1.  In the VTEX IO CLI, log in to your VTEX account by running `vtex login {accountName}`. Remember to replace the value between curly brackets with your account name.
2.  If the VTEX Intelligent Search app is not installed in your account, run the following command to install it:

    ```bash
    vtex install vtex.search-resolver@1.x vtex.admin-search@1.x
    ```

After successfully installing the app, access VTEX Admin, navigate to **Store Settings > Intelligent Search > Integrations**, and click `START INTEGRATION`.

</details>

<details>
<summary><b>Accounts wishing to migrate to the `5.x`</b></summary>

If you are using a different major version and want to migrate, please [open a ticket with VTEX Support](https://help.vtex.com/en/support) and request the installation of the Edition Store `vtex.edition-store@5.x`.

</details>

### Step 5 - Install the FastStore WebOps app

The [FastStore WebOps app](https://developers.vtex.com/docs/guides/faststore/getting-started-2-starting-the-project) helps you create, deploy, and manage your FastStore projects. It also provides performance insights and deployment management tools.

> ⚠️ The FastStore WebOps app only works in stores using the [Edition Store](https://developers.vtex.com/docs/guides/vtex-io-documentation-edition-app#list-of-native-edition-apps). If your store uses the Edition Business, also known as using the [Legacy CMS Portal](https://help.vtex.com/es/tracks/cms--2YcpgIljVaLVQYMzxQbc3z/1oN446gRGcR2s70RvBCAmj) technology, make sure to [open a support ticket](https://help.vtex.com/en/support) to change it to the Edition Store.

Once you have changed the edition, follow the instructions in this [requirements guide](https://developers.vtex.com/docs/guides/faststore/getting-started-requirements#install-the-vtex-io-cli-on-your-machine).

To install the app, follow these steps.

1.  In a terminal, log in to your VTEX account by running the following command. Replace `{accountName}` with your store account name, for example, `vtex login store`.

    ```bash
    vtex login {accountName}
    ```

2.  Install the FastStore WebOps app by running the following command:

    ```bash
    vtex install vtex.webops
    ```

    > ⚠️ The FastStore WebOps app only works in the production environment, so you must install it exclusively in your account's master environment.

3.  When prompted for confirmation, type `y` to proceed.

    ```bash
    ? Are you sure you want to force this operation on the master workspace on the account store? » (y/N)
    ```

You have successfully installed the FastStore WebOps app.

## Next steps

Now that your environment is ready, learn how to access and use the WebOps app: [2. Starting a new FastStore project](https://developers.vtex.com/docs/guides/faststore/getting-started-2-starting-the-project)

Was this feedback useful?

  • Yes
  • No

@github-actions

github-actions Bot commented Mar 27, 2026 •

Copy link
Copy Markdown
Contributor

🔍 Documentation feedback for docs/faststore/docs/getting-started/3-running-the-project-locally.mdx

1. General Feedback

The tutorial effectively guides the user through setting up a local FastStore development environment and making a first customization. The structure is generally clear, with well-defined sections for prerequisites and instructions. However, the document deviates from the specified rules in several key areas, including frontmatter completeness, the "Summary and next steps" section, and adherence to style guide rules regarding tone, voice, and spelling (specifically contractions and acronym definitions).

2. Actionable Feedback

  1. Frontmatter:
    • Title: The title 3. Running the project locally needs to include the product name "FastStore" and remove the numerical prefix. It should be revised to follow the template <Tutorial title> with the product name and a gerund verb, for example, Running your FastStore project locally.
    • createdAt: This field is mandatory but missing. Add a createdAt field with a valid ISO 8601 timestamp (e.g., createdAt: "2024-01-01T12:00:00Z").
    • slug: This field is mandatory but missing. Add a slug field, which should be a hyphenated, lowercase version of the revised title (e.g., running-your-faststore-project-locally).
  2. Body Structure - Summary and next steps:
    • The "Summary and next steps" section is missing a summary of the main concepts learned. Add a brief paragraph summarizing what the reader accomplished in this tutorial before the "Next step" section.
  3. Style Guide - Tone and Voice (R1.1) & Morphology (R3.3):
    • Replace subjective terms with factual descriptions to maintain a professional and direct tone:
      • "iterate quickly and safely" -> "iterate quickly and efficiently" or "iterate quickly and reliably".
      • "stable foundation" -> "robust foundation".
      • "strongly recommend" / "highly recommend" -> "We recommend" or "It is recommended".
      • "simple change" -> "basic change" or "initial change".
    • Improve clarity and conciseness by rephrasing wordy sentences:
      • "you might opt to use an alternative code editor" -> "you can use an alternative code editor".
      • "note that Visual Studio Code might help you follow along" -> "note that Visual Studio Code can help you follow along".
  4. Style Guide - Morphology (R3.1):
    • Rewrite passive voice sentences into active voice for greater clarity and directness:
      • "your store configuration was already set" -> "you already configured your store" or "the FastStore Onboarding already configured your store".
      • "changes you save are hot-reloaded" -> "the browser hot-reloads changes you save".
      • "The store's logo is set through the CMS" -> "You set the store's logo through the CMS".
  5. Spelling (R4.3):
    • Spell out acronyms on their first use, followed by the acronym in parentheses:
      • "CLI" -> "Command Line Interface (CLI)".
      • "CMS" -> "Content Management System (CMS)".
  6. Spelling (R4.5):
    • Replace contractions with their full forms in technical documentation:
      • "you'll" -> "you will".
      • "Let's" -> "Let us".

3. Suggested Revision

---
title: "Running your FastStore project locally"
slug: "running-your-faststore-project-locally"
createdAt: "2024-01-01T12:00:00Z"
updatedAt: "2026-03-27T16:31:00.813Z"
excerpt: "Run your FastStore project in a local development environment to preview changes in real time."
---

In this step, you will set up your local development environment, allowing you to iterate quickly and efficiently before shipping changes. Running the project locally gives you hot reload, faster feedback, and a robust foundation for customization.

## What you will accomplish

By the end of this step, you will have:

-   Run your project locally ([http://localhost:3000/](http://localhost:3000/))
-   Made your first customization by applying a new theme to your storefront

## Before you begin

<Steps>

### Required tooling

Before cloning your store’s repository, make sure the following tools are installed on your machine:

<details>
<summary>Node.js</summary>

To run your FastStore project, install the latest Node.js or a version higher than `15.0.0`.

-   [Install Node.js](https://nodejs.org/en/download)
</details>

<details>
<summary>Yarn</summary>

Use the [Yarn](https://yarnpkg.com/) Command Line Interface (CLI) to manage dependencies and run tasks, such as starting the development server.

<details>
<summary>Install Yarn on macOS by running the following:</summary>

```bash
brew install yarn
```

</details>

<details>
<summary>Install Yarn on Windows by running the following:</summary>

```bash
npm install -g yarn
```

</details>
</details>

<details>
  <summary>Git</summary>

When developing your store's website, you will use [Git](https://git-scm.com/) to push your code to the cloud. You will also use Git to download and install the required files for your project.

-   [Install Git on macOS using Homebrew](https://git-scm.com/download/mac)
-   [Install Git on Windows](https://git-scm.com/download/win)
-   [Install Git on Linux](https://git-scm.com/download/linux)

</details>

<details>
<summary>Visual Studio Code - Code Editor</summary>

When developing your store's website, you will need a code editor to write the code for your project, such as [Visual Studio Code](https://code.visualstudio.com/) (also known as VS Code). Visit the [VS Code](https://code.visualstudio.com/) website, download, and install the version compatible with your operating system.

</details>

> ℹ️ Although you can use an alternative code editor, note that [Visual Studio Code](https://code.visualstudio.com/) can help you follow along with the FastStore documentation since our documentation may include screenshots from VS Code.

### Enabling Developer Mode (Windows users)

We recommend enabling Developer Mode when using the terminal for FastStore projects.
Since FastStore projects rely on creating symlinks, this mode grants the necessary permissions and privileges, reducing the chance of errors during development.
To activate Developer Mode, refer to Microsoft's official guide on [Enabling your device for development](https://learn.microsoft.com/en-us/windows/apps/get-started/enable-your-device-for-development#accessing-settings-for-developers).

> ⚠️ Running the FastStore project as an Administrator is not recommended.

</Steps>

## Step 1: Cloning the store's repository

1.  Open the terminal and navigate to the directory where you want to store your project.

    > ℹ️ For Windows users, we recommend enabling the [Developer Mode](https://developers.vtex.com/docs/guides/faststore/getting-started-2-setting-up-the-project#enabling-developer-mode-windows-users) to run the terminal.

2.  Clone the repository created during the [FastStore Onboarding](https://developers.vtex.com/docs/guides/faststore/1-onboarding-starting-the-project#step-2-deploying-the-project) by running the following command in the terminal:

    ```bash
    git clone https://github.com/{orgName}/{storeName}
    ```

    > ⚠️ Replace `{orgName}` with the GitHub organization where your store's repository is located, and `{storeName}` with the name of your store's repository.

3.  Change into the working directory by running the following command:

    ```bash
    cd {storeName}
    ```

4.  Install all the dependencies listed in the `package.json` file by running the following command:

    ```bash
    yarn install
    ```

5.  Open your FastStore project in any code editor of your choice.

> ℹ️ Note that you already configured your store during the [FastStore Onboarding](https://developers.vtex.com/docs/guides/faststore/getting-started-2-starting-the-project). Therefore, there is no need to connect your project to your VTEX account.
  
If you want to review these configurations, you can access the [`discovery.config.js`](https://developers.vtex.com/docs/guides/faststore/developer-tools-config-options) file in the root directory of your project's repository.

## Step 2: Running a local server

Let us check what the project looks like in a web browser so far.

1.  Start a local development server to serve your website:

    ```bash
      yarn dev
    ```

    This may take a few minutes. Once your development server is ready, the command line will output a similar message as the following:

    ```bash
      ready - started server on 0.0.0.0:3000, url: http://localhost:3000
      event - compiled client and server successfully in 333 ms (951 modules)
    ```

    > ℹ️ The `dev` command is part of the [FastStore Command Line Interface (CLI)](https://developers.vtex.com/docs/guides/faststore/getting-started-3-faststore-cli), a pre-configured command line interface in your starter project. Using the CLI, this command enables you to execute code to keep your store's project up-to-date with the [@faststore/core package](https://developers.vtex.com/docs/guides/faststore/project-structure-overview#packagejson).

2.  Now, open your browser and go to [http://localhost:3000](http://localhost:3000).

    ![localhost-example](https://vtexhelp.vtexassets.com/assets/docs/src/starter-gif___42003e72ece61064991a34c3f14e398f.gif)

While the development server is running, the browser hot-reloads changes you save. To stop the server, press `Ctrl + C` in the terminal. To restart it, run `yarn dev` again.

## Step 3: Making the first change in your store frontend

Now that your store is up and running locally, let us make an initial change in the storefront.

We will start updating the store's [theme](https://developers.vtex.com/docs/guides/faststore/themes-overview#available-themes). For this customization, we will use the [Soft Blue theme](https://developers.vtex.com/docs/guides/faststore/themes-soft-blue).

1.  Create a new file named `soft-blue.scss` in `src/themes`. This will be the new theme of your store.

2.  Add the following styles to `src/themes/soft-blue.scss`:

    ```scss src/themes/soft-blue.scss
    // ----------------------------------------------------------
    // GLOBAL TOKENS
    // Theme Soft Blue
    // ----------------------------------------------------------

    @layer theme {
      .theme {
      // --------------------------------------------------------
      // Colors (Branding Core)
      // --------------------------------------------------------

      // PALETTE
      --fs-color-main-0: #ecf0ff;
      --fs-color-main-1: #d8e2ff;
      --fs-color-main-2: #00419e;
      --fs-color-main-3: #002c71;
      --fs-color-main-4: #001947;

      --fs-color-accent-0: #ebdcff;
      --fs-color-accent-1: #8d50fd;
      --fs-color-accent-2: #732fe2;
      --fs-color-accent-3: #5900c8;
      --fs-color-accent-4: #4700a0;

      // HIERARCHY
      --fs-color-primary-bkg: var(--fs-color-main-4);
      --fs-color-primary-bkg-active: var(--fs-color-main-2);
      --fs-color-primary-bkg-light: var(--fs-color-main-0);
      --fs-color-primary-bkg-light-active: var(--fs-color-main-1);

      // SITUATIONS
      --fs-color-success-bkg: #cee8de;
      --fs-color-warning-bkg: #f6e0ba;

      // COMPONENTS & STATES
      --fs-color-text-display: var(--fs-color-main-4);

      --fs-color-action-bkg: var(--fs-color-accent-3);
      --fs-color-action-bkg-hover: var(--fs-color-accent-2);
      --fs-color-action-bkg-active: var(--fs-color-accent-1);

      // --------------------------------------------------------
      // Typography (Branding Core)
      // --------------------------------------------------------

      // FACE
      --fs-text-face-body: 'Lato', -apple-system, system-ui, BlinkMacSystemFont, sans-serif;

      // --------------------------------------------------------
      // Refinements
      // --------------------------------------------------------

      // BORDERS
      --fs-border-radius: 0.25rem;

      // SHADOW
      --fs-shadow: none;
      --fs-shadow-darker: 0 0 10px rgb(0 0 0 / 20%);
      --fs-shadow-hover: 0 1px 4px rgb(0 0 0 / 10%), 0 6px 8px rgb(0 0 0 / 10%);

      // --------------------------------------------------------
      // FS UI Components
      // --------------------------------------------------------
      // Add here the customizations for FastStore UI components.

        --fs-logo-width: 8rem;

        [data-fs-product-card] {
          --fs-product-card-border-color: transparent;
          --fs-product-card-border-color-hover: var(--fs-border-color-light);

          &[data-fs-product-card-bordered='true'] {
            --fs-product-card-border-color: var(--fs-border-color-light);
          }
        }
      }
    }
    ```

3.  Open the `discovery.config.js` file and change the `theme` from `custom-theme` to `soft-blue`.

    ```js discovery.config.js
      theme: 'soft-blue',
    ```

4.  Restart the server and check in the browser the new theme applied to your store. You may need to refresh the page.

    ![theme-soft-blue](https://vtexhelp.vtexassets.com/assets/docs/src/soft-blue___9eb9e3e506de6396df954598739be8f8.png)

    > ℹ️ You set the store's logo through the [Content Management System (CMS)](https://developers.vtex.com/docs/guides/cms-for-faststore-storefronts).

## Summary and next steps

In this tutorial, you learned how to set up your local FastStore development environment, run your project, and apply a new theme to your storefront. You are now ready to explore further customizations.

## Next step

Now that your local environment is running, learn about your project's structure to understand where to make customizations: [4. Understanding the project structure](https://developers.vtex.com/docs/guides/faststore/getting-started-3-faststore-project-structure)

Was this feedback useful?

  • Yes
  • No

@github-actions

github-actions Bot commented Mar 27, 2026 •

Copy link
Copy Markdown
Contributor

🔍 Documentation feedback for docs/faststore/docs/getting-started/2-starting-the-project.mdx

Here's a review of the Tutorial based on the provided rules:

1. General Feedback

The tutorial provides a clear, step-by-step guide for starting a new FastStore project, which aligns well with the purpose of a tutorial. The use of second-person pronouns and a generally professional tone is commendable. However, there are several deviations from the specified rules, primarily concerning the frontmatter, the completeness of the "Summary and next steps" section, the consistent use of active voice, and the proper expansion of acronyms and avoidance of contractions. Addressing these points will significantly improve adherence to the style guide and overall quality.

2. Actionable Feedback

  1. Frontmatter Issues:

    • Title: The title 2. Starting a new FastStore project includes a number (2.) which should be removed. The rule states the title should be <Tutorial title> without numbering.
    • Excerpt: The excerpt field is not part of the mandatory or optional frontmatter fields specified in the rules. It should be removed.
    • Missing Mandatory Fields: The slug and createdAt fields are mandatory but are missing from the frontmatter.
    • Missing Optional Field: The updatedAt field is optional but good practice to include.
  2. Body Structure - Summary and Next Steps:

    • The "Summary and next steps" section only includes "Next step". The rule requires a summary of the main concepts learned in addition to suggesting follow-up resources.
  3. Morphology - Active Voice (R3.1):

    • Several sentences use passive voice, which should be rewritten in active voice for clarity and directness.
      • "The app is installed in the master environment..." should be "You install the app in the master environment..." or "Install the app in the master environment..."
      • "Approved changes are merged into the repository’s main branch and automatically deployed to production." should be "You merge approved changes into the repository’s main branch, and the system automatically deploys them to production."
      • "Your project will be accessible at https://{accountName}.vtex.app/..." should be "You can access your project at https://{accountName}.vtex.app/..."
      • "The deployment process will begin, and once it is complete, you should see the following:" should be "The system will begin the deployment process. Once it completes, you should see the following:"
  4. Spelling - Acronyms (R4.1, R4.3):

    • Acronyms must be spelled out on their first use in the document, followed by the acronym in parentheses.
      • CI/CD should be "Continuous Integration/Continuous Delivery (CI/CD)".
      • CMS should be "Content Management System (CMS)".
      • SEO should be "Search Engine Optimization (SEO)".
      • GTM should be "Google Tag Manager (GTM)".
  5. Spelling - Contractions (R4.5):

    • Contractions should be avoided in technical documentation.
      • "you'll use" should be "you will use".
      • "What you'll accomplish" should be "What you will accomplish".
      • "you’ll need" should be "you will need".

3. Suggested Revision

---
title: 'Starting a new FastStore project'
slug: 'starting-a-new-faststore-project'
createdAt: '2023-10-27T10:00:00Z'
updatedAt: '2023-10-27T10:00:00Z'
---

In this step, you will use the [FastStore WebOps app](https://developers.vtex.com/docs/guides/faststore/1-onboarding-dashboard) to create your FastStore project, connect it to GitHub, and deploy a live preview.

This establishes your project’s source of truth and Continuous Integration/Continuous Delivery (CI/CD) path — the foundation for all later steps in this track.

## What you will accomplish

By the end of this step, you will have:

- Created your FastStore project with basic configuration (project name, Search Engine Optimization (SEO) tags, Google Tag Manager (GTM), catalog).
- Connected your project to a GitHub repository for version control.
- Set up the Content Management System (CMS) integration for content management.
- Deployed your project and generated a live preview of your storefront.

You can access your project at `https://{accountName}.vtex.app/` and it will be ready for local development in the next step.

## Getting to know the WebOps app

[FastStore WebOps](https://developers.vtex.com/docs/guides/faststore/1-onboarding-dashboard) is the **control plane** for FastStore projects. It manages every stage of your storefront’s lifecycle, from creation to deployment, and integrates with your GitHub repository and VTEX account to facilitate collaboration and automation.

    ![dashboard-overview](https://cdn.jsdelivr.net/gh/vtexdocs/dev-portal-content@main/images/dashboard-overview.png)

WebOps connects your storefront code (GitHub) with your VTEX infrastructure, enabling a branch-based workflow for development and production. Keep the following in mind:

- **Environment requirement:** WebOps operates exclusively in the production environment. Install it only in your account’s `master` environment.
- **Development workflow:** FastStore uses a [Git branching model](https://docs.github.com/en/pull-requests/collaborating-with-pull-requests/proposing-changes-to-your-work-with-pull-requests/about-branches) for development and testing:
  - You install the app in the `master` environment of your VTEX account.
  - Development and testing occur on Git branches.
  - You merge approved changes into the repository’s `main` branch, and the system automatically deploys them to production.

> ℹ️ Unlike [VTEX IO workspaces](https://developers.vtex.com/docs/guides/vtex-io-documentation-workspace), FastStore uses a Git-based branching workflow.

## Before you begin

<Steps>

### Check permissions

To start a FastStore project, users must have the **Owner (Admin Super)** [role](https://help.vtex.com/en/tutorial/roles--7HKK5Uau2H6wxE1rH5oRbc#roles).

### Create your store catalog

Create a catalog to populate and test your store. It should include essential components such as product listing pages, search, product details, and checkout.
Developing without a catalog may result in incomplete testing, data integration issues, and rework later.

For more information, refer to the [Catalog documentation](https://help.vtex.com/docs/tracks/catalog).

### Have a GitHub account

To complete the FastStore WebOps onboarding, you will need a GitHub account to host your project. You can use either a [personal account](https://docs.github.com/en/account-and-profile/setting-up-and-managing-your-personal-account-on-github) or a [GitHub organization](https://docs.github.com/en/organizations/collaborating-with-groups-in-organizations/about-organizations).
If you use a GitHub organization, ensure you have **admin access** to it.

</Steps>

## Step 1: Setting up the project

1. Open the VTEX Admin and access **Storefront > FastStore WebOps**.
2. Click `Start Project`.
3. In the **Setup & Create Project** page, configure the following options for your store:

### Project

Choose the option that best fits your project's purpose.
This helps us understand what you are trying to achieve with FastStore and improve your experience.

| Field                                                     | Description                                                    |
| --------------------------------------------------------- | -------------------------------------------------------------- |
| **Project name**                                          | Enter your FastStore project's name, e.g., `Marcio Car store`. |
| **Which option best describes the goal of your project?** | Choose the option that best fits your project’s purpose.       |

### SEO Tags

| Field               | Description                                                                                                                                                                                                                                                     |
| ------------------- | --------------------------------------------------------------------------------------------------------------------------------------------------------------------------------------------------------------------------------------------------------------- |
| **Title Tag**       | Enter a keyword-optimized title for your store. For example: `Buy Online with the Best Game Store - GameStore`. In this example, we used the length limit of around 50-60 characters to ensure it is fully displayed in search results without being truncated. |
| **Description Tag** | Enter a brief description of your store, for example, `Shop online at GameStore, the best game store for PC, Xbox, PS4 and Headphones. Explore our wide selection and buy your favorite games today!`                                                            |
| **Title Template**  | Enter a page title that helps search engines and users better understand the content of your store. For example, `The best game store - GameStore`.                                                                                                              |
| **Site Author**     | Enter the name of the agency or person responsible for the development of the storefront.                                                                                                                                                                       |

### Google Tag Manager

| Field      | Description                                                                                                                                |
| ---------- | ------------------------------------------------------------------------------------------------------------------------------------------ |
| **GTM ID** | Enter the Google Tag Manager ID (GTM ID) associated with the GTM container responsible for managing and organizing the tags of your store. |

### Catalog

| Field       | Description                                            |
| ----------- | ------------------------------------------------------ |
| **Catalog** | Choose which catalog your store should be linked with. |

## Step 2: Setting up integrations

On this page, you will set up the native Content Management System (CMS) integration and connect to a GitHub organization.

### CMS Integration

Configure the native [CMS](https://developers.vtex.com/docs/guides/cms-for-faststore-storefronts) integration for your store.

**Select a store**

Choose whether to create a new CMS store or connect to an existing one:

- **New store** (default): Creates a new CMS store for your FastStore project. Fill in the following fields:

  ![new-store-cms](https://vtexhelp.vtexassets.com/assets/docs/src/cms-integrations-new___52da60694ecf236cffa8630c2ab45c17.png)

  | Field | Description |
  | ----- | ----------- |
  | **Store ID** | Unique identifier for the store (e.g., `my-store`). |
  | **Store name** | Display name for the store (e.g., `My Store`). |
  | **Build type** | Choose between the following options: <ul><li><b>FastStore WebOps</b> (default): Specifies that store builds will be performed by FastStore WebOps.</li><li><b>No build:</b> Specifies that the store will not trigger builds on any system.</li><li><b>External build system:</b> Specifies that the store build will be performed by an external system. When choosing this type, a new field becomes visible to specify the Webhook URL (required for this build type), which will be the endpoint to be called to perform the store build.</li></ul> |

- **Existing store**: Connects your FastStore project to a CMS store that already exists in your account. When this option is selected, a dropdown lists all available CMS stores for your account. Select the store you want to use from the dropdown.

  ![existing-store-cms](https://vtexhelp.vtexassets.com/assets/docs/src/cms-integrations-new-2___ef95c8033e8c050d572b34a89aa1957e.png)

  > ⚠️ Use this option if you previously deleted a WebOps project and are going through the onboarding flow again without erasing existing CMS content.

### Git Provider

Connect with a GitHub personal account or organization of your choice to host the source code of your FastStore project.

    > ⚠️ If you choose to install the app in a GitHub organization, make sure you have admin access to an organization.

To connect to the FastStore WebOps app, follow these steps:

1. Click `Connect with GitHub`. A new browser tab will open on the side for you to integrate the app with GitHub.

    > ⚠️ If you are not logged in to your GitHub account, in the new tab, you will be asked to log in. Then, you can continue to the next step.

2. Once you are logged in to your GitHub account, choose the organization or your personal account you want to install the app. You will be redirected to the **Settings** page on GitHub.

    > ⚠️ Once you define the GitHub organization, you cannot change it later.

3. In **Repository access**, choose one of the following options: **All repositories from the organization** or **Only select repositories**.

4. Click `Install`.

The following successful message will appear on the page:

    ```
    Success! You can now close this page and proceed with the onboarding process.
    ```

After seeing the success message, close the browser tab and continue the onboarding process in the VTEX Admin.

5. Now that the app is integrated with GitHub, select which repository you want to start the project:

    - **New repository:** Create a repository from scratch. In this option, you only need to type a name for the repository, and after clicking `Create`, it will create the repository for you.

    - **Existing repository:** Select an existing repository from the organization to start the project.

6. Click `Create`. The system will begin the deployment process. Once it completes, you should see the following:

## Step 3: Deploying the project

After completing the setup for your store, the deployment process will begin. This process involves creating a GitHub repository and a default domain for your project. Once the deployment process is complete, you should see the following:

    ![success-scenario](https://vtexhelp.vtexassets.com/assets/docs/src/deploy-summary-webops___ff30808c6eef395f89173c38880b683f.png)

| Option                   | Description                                                                                                                                                                                                                                                                                                                                 |
| ------------------------ | ------------------------------------------------------------------------------------------------------------------------------------------------------------------------------------------------------------------------------------------------------------------------------------------------------------------------------------------- |
| **Your Repository**      | Access the store's GitHub repository and start setting up and customizing your store.                                                                                                                                                                                                                                                       |
| **Documentation**        | Access the FastStore Portal Documentation.                                                                                                                                                                                                                                                                                                  |
| **Customization**        | Access the documentation on how to customize your store.                                                                                                                                                                                                                                                                                    |
| **View Dashboard**       | Access the Dashboard with the current status of your store, including its domains, deployed versions, store preview, and Lighthouse scores. For more information, please refer to the [Dashboard](https://developers.vtex.com/docs/guides/faststore/1-onboarding-dashboard) guide. |

> ⚠️ If repository creation fails and no live preview is generated, click **Retry** to redeploy.

## Summary and next steps

In this tutorial, you successfully created a new FastStore project using the WebOps app, configured its basic settings, integrated it with GitHub and a Content Management System (CMS), and deployed a live preview of your storefront. This foundational setup is crucial for developing and managing your FastStore e-commerce site.

Now that your store is up and running with a live preview, set up your local development environment: [3. Running the project locally](https://developers.vtex.com/docs/guides/faststore/getting-started-2-setting-up-the-project)

Was this feedback useful?

  • Yes
  • No

@github-actions

Copy link
Copy Markdown
Contributor

🏷️ Frontmatter errors

docs/faststore/docs/getting-started/webops/dashboard.mdx

Field issues

Field Error
updatedAt 'updatedAt' must be in ISO 8601 format (YYYY-MM-DDThh:mm:ss.sssZ).

@github-actions

github-actions Bot commented Mar 27, 2026 •

Copy link
Copy Markdown
Contributor

🔍 Documentation feedback for docs/faststore/docs/getting-started/webops/dashboard.mdx

Here's a review of the provided Explanation document against the specified rules:

1. General Feedback

The document is well-structured with clear headings and makes good use of tables and images to explain complex information, adhering well to rules R1.1, R1.3, R1.4, R2.1, and R2.2. It also includes numerous relevant cross-references and links (R1.5).

However, the primary area for improvement is the inclusion of step-by-step instructions within an explanation article, which violates rule R1.2. Explanation articles should focus on what a concept is and why it matters, not how to perform specific tasks. Procedural guidance should be moved to dedicated "How-to" guides and linked from the explanation.

2. Actionable Feedback

The following specific changes are needed to align with rule R1.2:

  1. Accessing the Dashboard:

    • Current: "To access the WebOps dashboard, go to Storefront > FastStore WebOps in the VTEX Admin."
    • Correction: Rephrase to describe the location rather than providing an instruction.
  2. Rerunning a build:

    • Current: Contains a numbered list of steps to rerun a build.
    • Correction: Remove the step-by-step instructions. Instead, state that builds can be rerun and provide a link to a dedicated "How-to" guide for the procedure.
  3. Configuring Lighthouse scores:

    • Current: Contains a numbered list of steps to set the pages for Lighthouse testing.
    • Correction: Remove the step-by-step instructions. State that pages can be configured for Lighthouse testing and provide a link to a dedicated "How-to" guide for the procedure.
  4. Setting Production Domain:

    • Current: "In the Production domain section, select the store domain from the dropdown list in the Host field and click Add to set up the primary domain of your store."
    • Correction: Rephrase to describe the functionality of the section rather than instructing the user.
  5. Adding Variables and Secrets:

    • Current: "In the Variables and secrets section, complete the following fields and click Add:"
    • Correction: Rephrase to describe the functionality. Since there's an existing guide "Managing variables and secrets," this section should refer to that guide for the "how-to" details.
  6. Updating/Deleting Variables and Secrets:

    • Current: "In this section, you can update or delete an existing secret by clicking ⋮ and selecting the corresponding option, Edit or Delete."
    • Correction: Rephrase to describe the functionality. Again, refer to the "Managing variables and secrets" guide for the "how-to" details.
  7. Deleting the Project:

    • Current: "To delete your FastStore project, click More actions (⋮). Then, click Delete project."
    • Correction: Rephrase to describe the capability rather than providing an instruction. If this is a critical procedure, it should have its own how-to guide.

3. Suggested Revision

---
title: 'FastStore WebOps - Dashboard'
updatedAt: "22026-02-03T13:16:12.258Z"
---

Once you [create your FastStore project](https://developers.vtex.com/docs/guides/faststore/1-onboarding-starting-the-project#step-2-deploying-the-project) or if you're already working on customizing it, you can use the WebOps dashboard to view website deployments and performance.

The WebOps dashboard provides an overview of website builds and deploy previews and offers suggestions to improve storefront performance based on [Lighthouse scores](https://developer.chrome.com/docs/lighthouse/performance/performance-scoring).
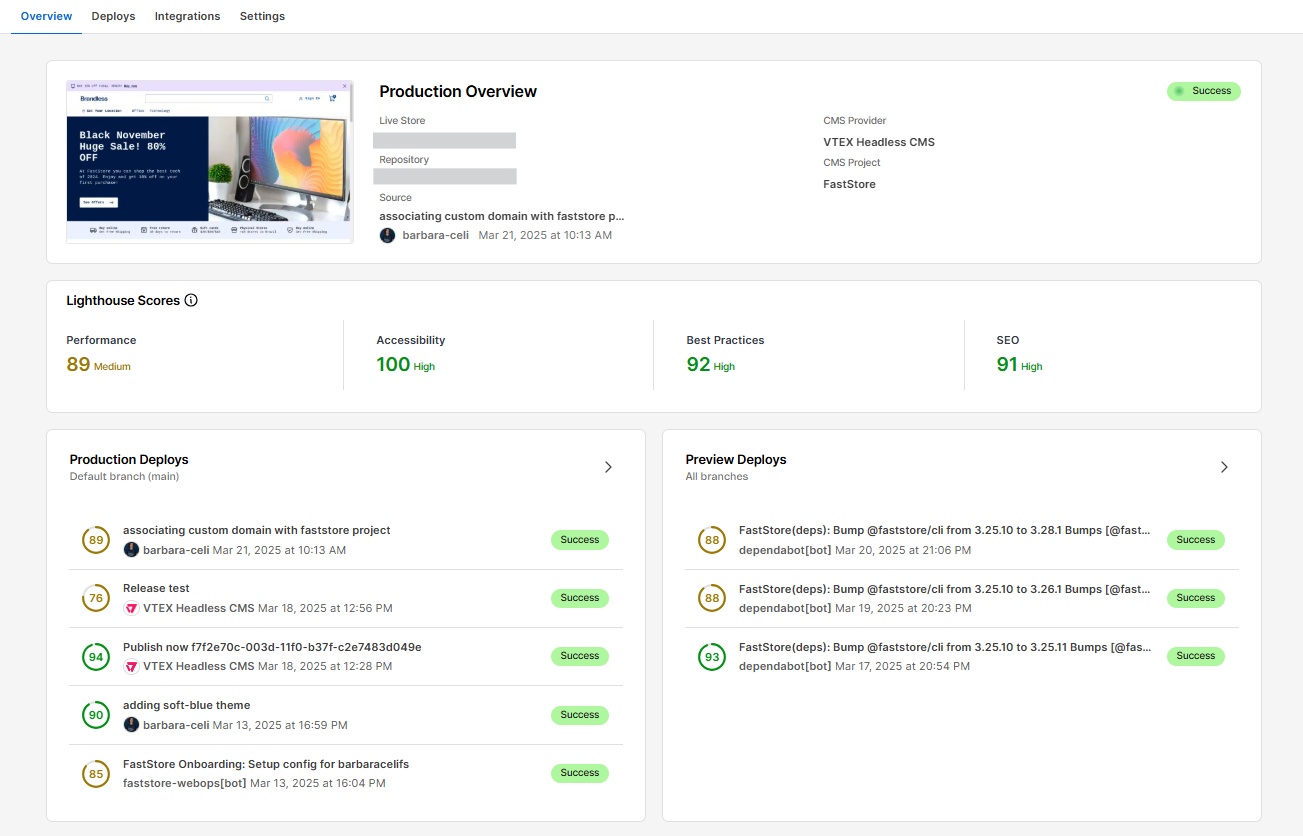
![dashboard-overview](https://cdn.jsdelivr.net/gh/vtexdocs/dev-portal-content@main/images/dashboard-overview.png)

The WebOps dashboard is accessible via **Storefront > FastStore WebOps** in the VTEX Admin. The dashboard has four tabs: [Overview](#overview), [Deploys](#deploys), [Integrations](#integrations), and [Settings](#settings).

---

## Overview

The **Overview** tab shows key store details, including the live store URL, CMS information, and the latest deployment.

### Production overview

The **Production overview** section provides the following information about the latest live store deployment:

| Field            | Description                                                                                      |
| :--------------- | :----------------------------------------------------------------------------------------------- |
| **Live store**   | URL of your production environment accessible to shoppers.                                       |
| **Repository**   | GitHub repository associated with the project.                                                   |
| **Source**       | Commit for the current deployment, including date, time, and author.                             |
| **CMS provider** | Link to [CMS](https://developers.vtex.com/docs/guides/cms-for-faststore-storefronts). |
| **CMS project**  | Link to the FastStore project in CMS.                                                   |

#### Live deployment statuses

This section also displays the status of the live deployment:

*   **Success:** The commit was deployed to the production environment and is live.
*   **Queued:** The commit is waiting to be deployed.
*   **In progress:** The commit is currently being deployed.
*   **Failed:** The deployment failed. You can find more details by clicking the link below the `Deploy` button.

### Lighthouse scores

When your store goes live (in production), ensuring optimal performance and a good user experience is crucial. The Lighthouse scores section offers insights into four key areas, helping you understand their impact on store performance.

*   **Performance:** Indicates how fast your pages load.
*   **Accessibility:** Reflects how usable your pages are for people with disabilities.
*   **Best practices:** Indicates how well your pages follow coding best practices.
*   **SEO:** Reflects how well your pages are optimized for search engines.

These scores are based on the pages defined for testing in the [Integrations](#integrations) tab.

### Production deploys

This section lists recent deployments to your production store. Each item on the list is composed of the following:
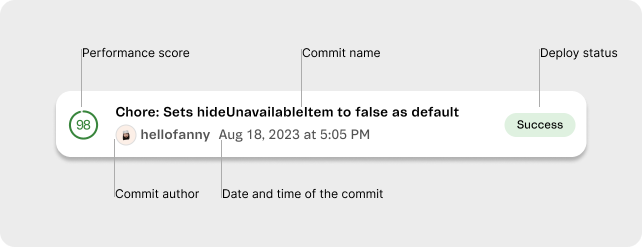
![dashboard-lighthouse-score](https://vtexhelp.vtexassets.com/assets/docs/src/dashboard-production-deploys___840fcb7b30bc2c7a1e4e5d1d255a58f9.png)

For a complete list of store deployments and their details, check the [Deploys](#deploys) tab.

### Preview deploys

This section lists all the deploy previews created for GitHub branches in your project repository. These previews are automatically available for each pull request opened in its corresponding branch. You can [configure which branches generate preview deployments](https://developers.vtex.com/docs/guides/faststore/webops-configuring-production-and-preview-branches#configuring-preview-branch-filters) in the Integrations tab.

## Deploys

The **Deploys** tab provides insights into store deployments, including their status (success, failed, etc.). The table below summarizes the key features of the Deploys tab.

![deploys-webops](https://cdn.jsdelivr.net/gh/vtexdocs/dev-portal-content@main/images/deploys-webops.png)

| **Feature**          | Description                                                                                                                                                                                                                                                                                                                                                                                                           |
| -------------------- | --------------------------------------------------------------------------------------------------------------------------------------------------------------------------------------------------------------------------------------------------------------------------------------------------------------------------------------------------------------------------------------------------------------------- |
| 1 - Search bar       | Allows you to search by deploy ID, commit, message, or author.                                                                                                                                                                                                                                                                                                                                                        |
| 2 - Pagination       | Allows you to navigate through pages of deployment data.                                                                                                                                                                                                                                                                                                                                                              |
| 3 - Environment      | Filters deployments by environment: <ol><li>Production: The live store customers can interact with.</li><li>Preview: Test environment for new features, design changes, and code modifications before releasing them to production.</li></ol>                                                                                                                                                                         |
| 4 - Branch           | Filters deployments by GitHub branches.                                                                                                                                                                                                                                                                                                                                                                               |
| 5 - Status           | Filters deployments by status: <ol><li>Queued: The deployment is waiting to be executed.</li><li>In progress: The deployment is being executed.</li><li>Success: The deployment was completed successfully.</li><li>Failed: The deployment encountered an error and didn't complete as expected.</li></ol>                                                                                                            |
| 6 - Sort by          | Filters deployments by **Latest first** or **Oldest first**.                                                                                                                                                                                                                                                                                                                                                          |
| 7 - Deployment table | Lists all store deployments with the following information: <ol><li>Score: Lighthouse score for the deployment.</li><li>Source: Commit ID and branch.</li><li>Author: Deployment author and the date and time of the deployment.</li><li>Environment: The environment that was changed, Production or Preview.</li><li>Deploy ID: The ID of the specific deployment.</li><li>Status: The deployment status.</li></ol> |

### Deployment details

For more information, click any entry in the deployment table.
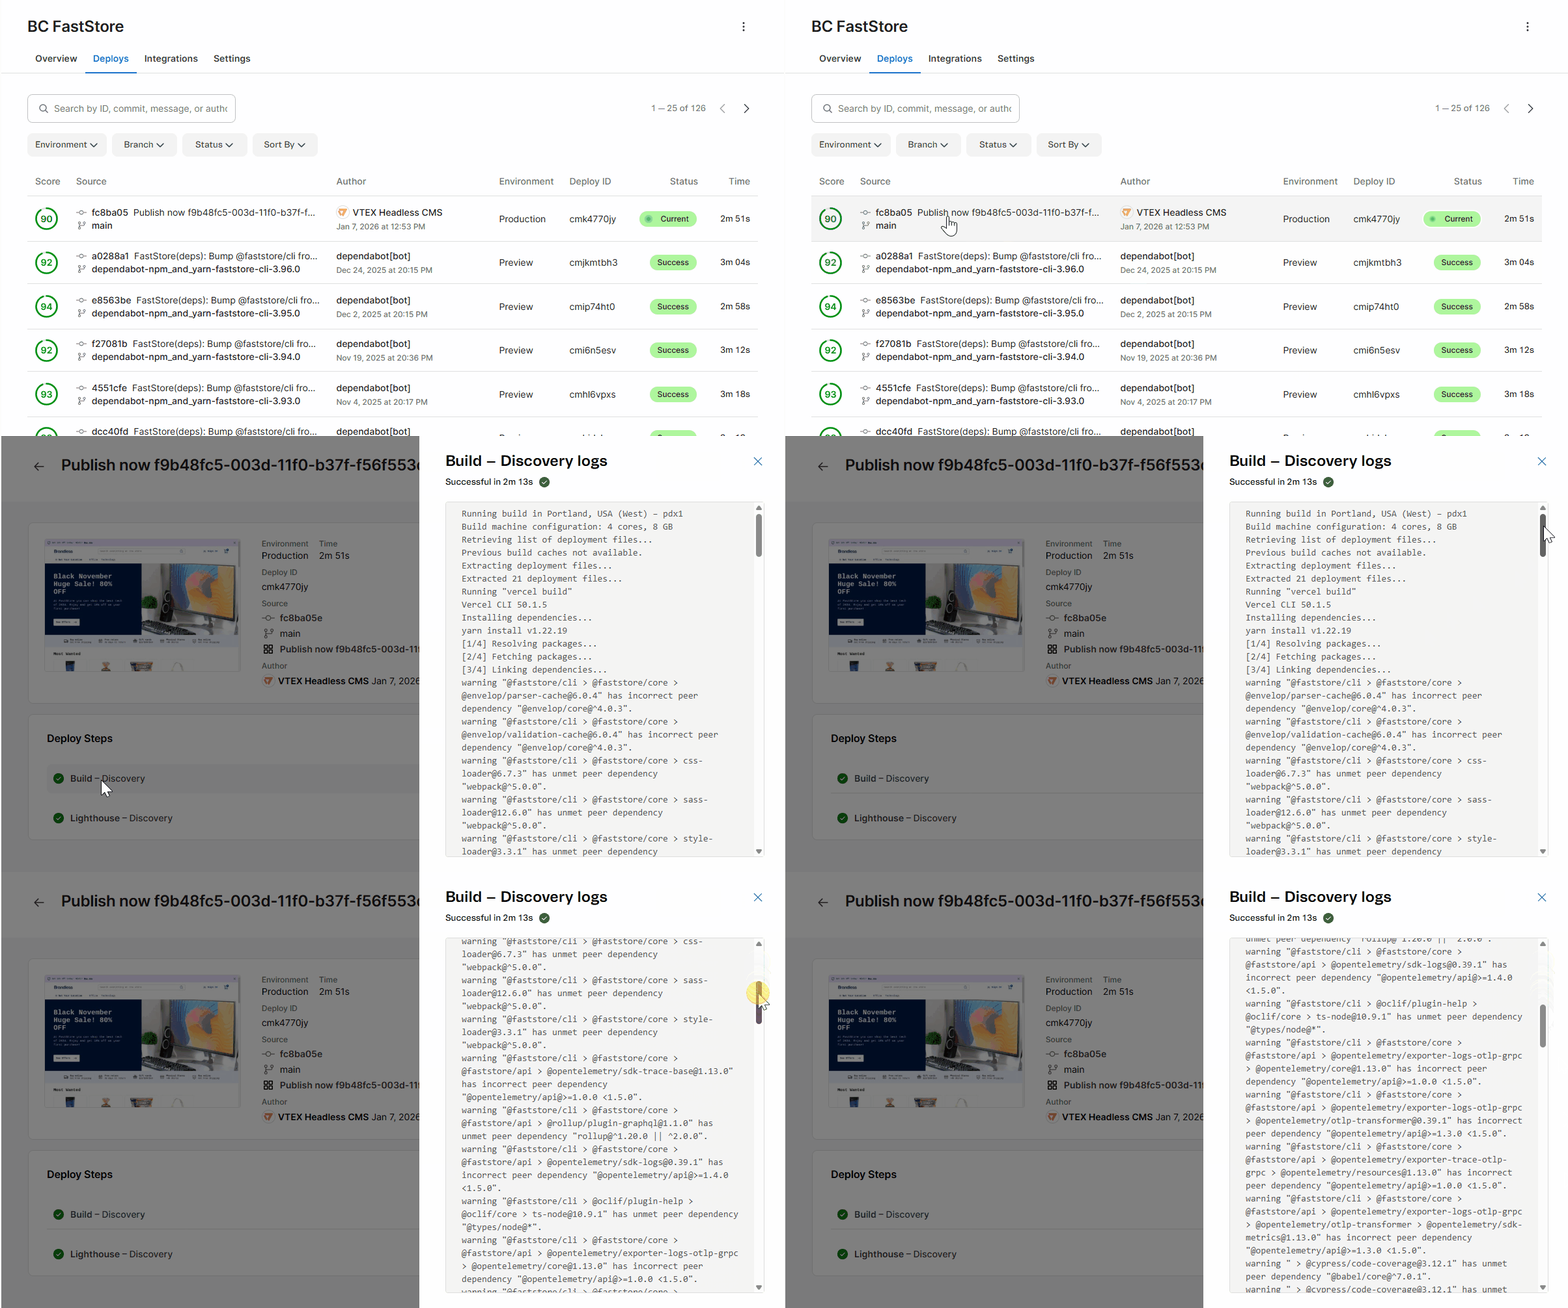
![deployment-details](https://cdn.jsdelivr.net/gh/vtexdocs/dev-portal-content@main/images/webops-deploys.gif)

In the **Deploy steps** section, select a step (for example, **Build - Discovery**) to view logs. The logs, shown on the right, help diagnose failed deployments.

#### Rerunning a build

If a deployment fails due to issues unrelated to your code, such as environment variables or temporary network problems, you can rerun the build job directly in WebOps without pushing a new commit to the repository. For detailed instructions on how to perform this action, refer to [Rerunning a FastStore WebOps Build](https://developers.vtex.com/docs/guides/faststore/how-to-rerun-webops-build).
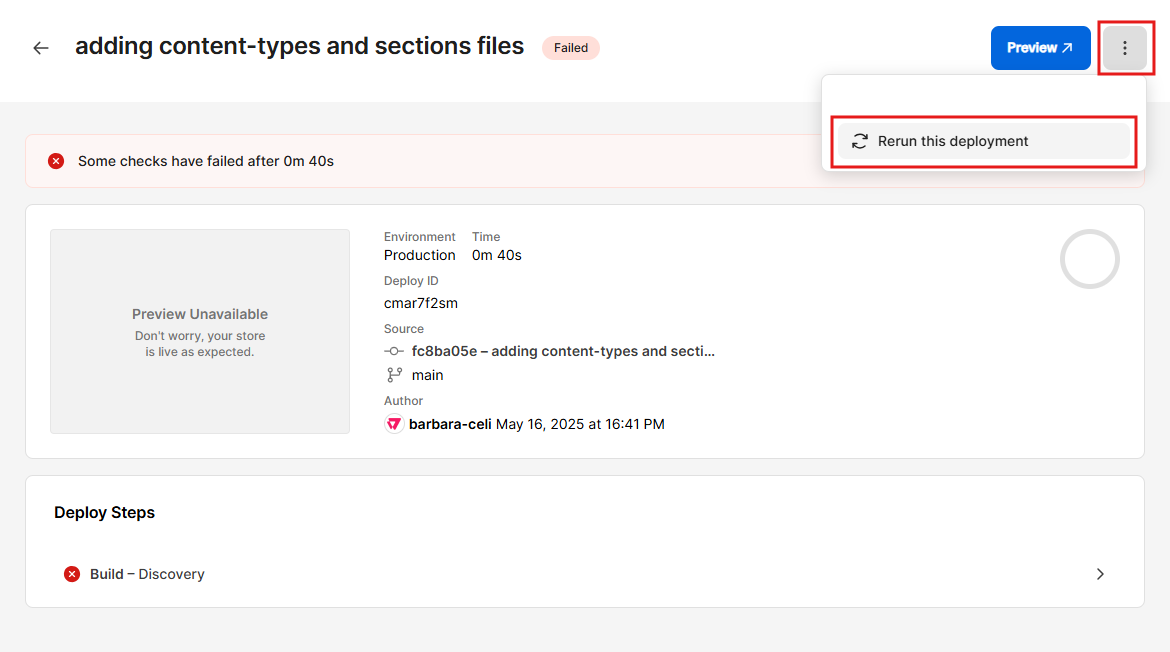
![rerun-webops](https://cdn.jsdelivr.net/gh/vtexdocs/dev-portal-content@main/images/rerun-webops.png)

> ℹ️ If the logs indicate problems in your code (for example, syntax errors and failing tests), update the code in your local environment and push a new commit. WebOps will automatically trigger a new deployment for that commit.

## Integrations

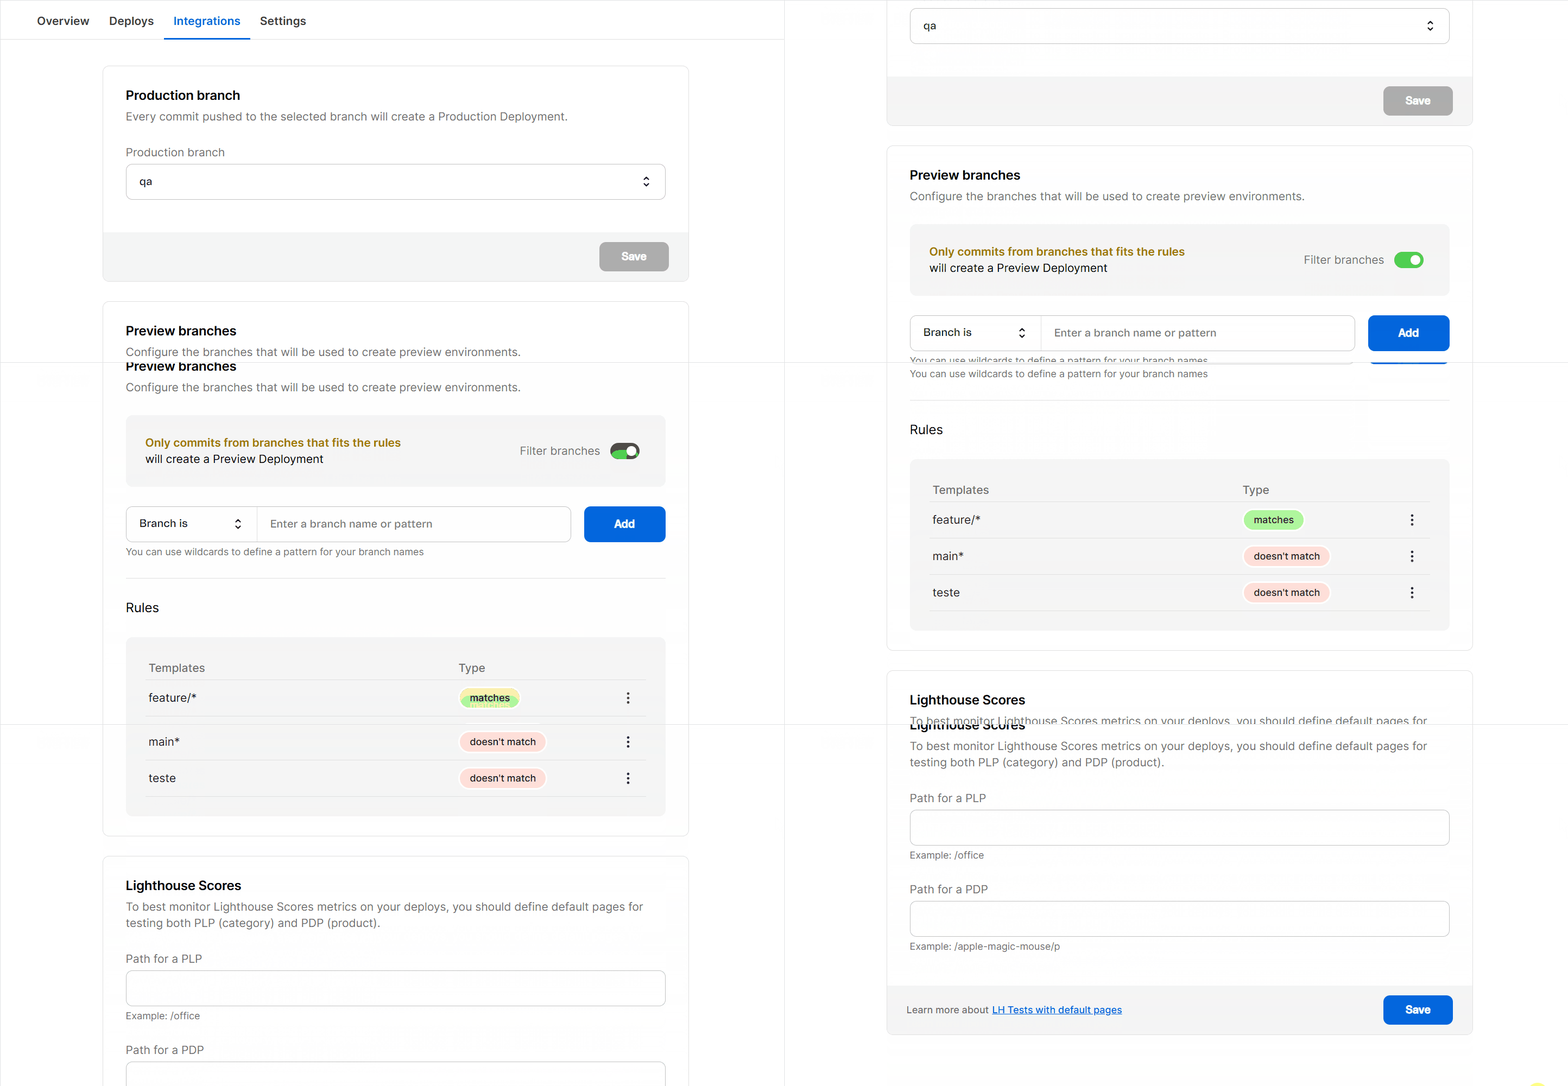
The **Integrations** tab allows you to configure branch settings and store pages for Lighthouse tests. The tab contains the following sections:

1.  **[Production branch](#production-branch):** Configures which Git branch generates production builds for your account.
2.  **[Preview branches](#preview-branches):** Controls which branches generate preview deployments.
3.  **[Lighthouse scores](#lighthouse-scores):** Configures store pages for Lighthouse testing.
![integrations-webops](https://vtexhelp.vtexassets.com/assets/docs/src/customizing-branches-integrations___ae60f6b2b7c97b7200d8b8295fe7c755.gif)

### Production branch

The **Production branch** section allows you to configure which Git branch generates production builds for your account.

### Preview branches

The **Preview branches** section allows you to control which branches generate preview deployments by including or excluding patterns.

#### Rules

In the **Rules** subsection, you can manage your rules by editing or removing them.

> ℹ️ For detailed instructions on branch configuration, see the guide [Configuring production and preview branches in WebOps](https://developers.vtex.com/docs/guides/faststore/webops-configuring-production-and-preview-branches).

### Lighthouse scores

The **Lighthouse scores** section allows you to configure store pages for Lighthouse testing. You can specify the URLs for a product listing page (PLP) and a product details page (PDP) to undergo automatic Lighthouse score testing during deployments, ensuring a consistent testing experience. For detailed instructions on configuring these pages, refer to [Configuring Lighthouse Test Pages in WebOps](https://developers.vtex.com/docs/guides/faststore/how-to-configure-lighthouse-pages).

Once you've set the pages for testing and after a new deployment, go to the **Overview** tab and access the **Lighthouse scores** section to check the scores for those pages.

## Settings

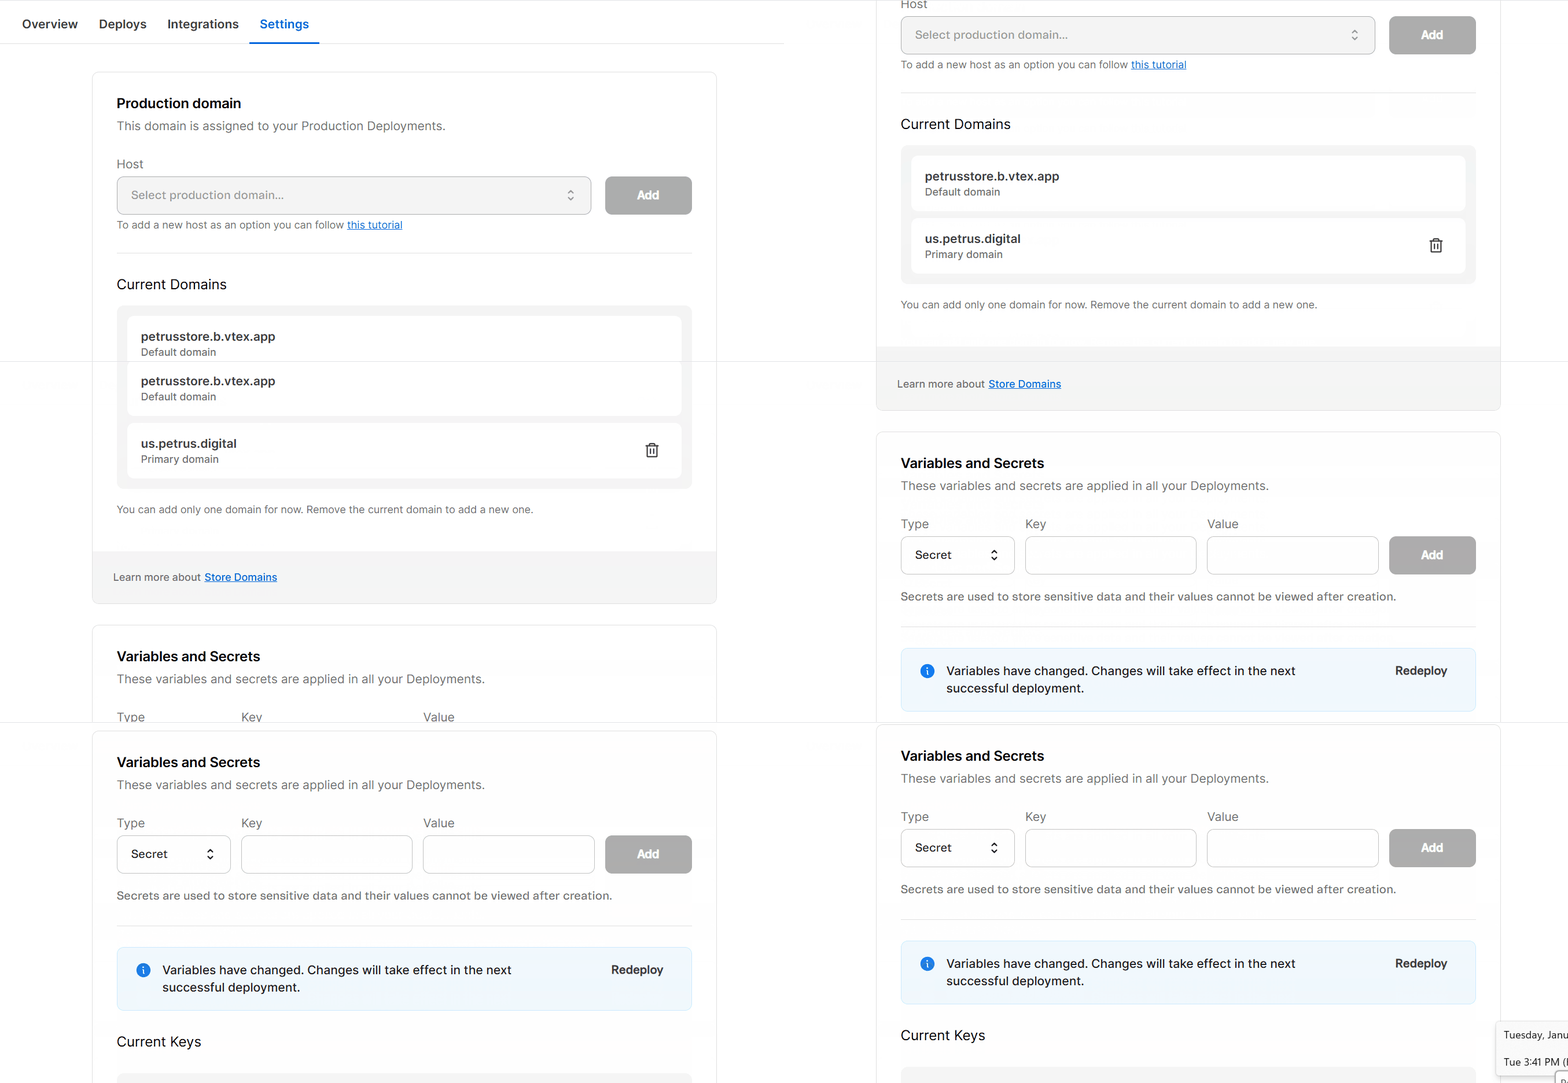
The **Settings** tab is where you manage the following configurations:

*   [**Production domain**](#production-domain): Sets the primary URL customers use to access the live store.
*   [**Variables and secrets**](#variables-and-secrets): Stores and allows secure management of sensitive information, such as API keys and passwords, required during FastStore deployment.
![settings-webops](https://cdn.jsdelivr.net/gh/vtexdocs/dev-portal-content@main/images/webops-settings.gif)

### Production domain

As part of the [go-live](https://developers.vtex.com/docs/guides/faststore/go-live-overview) process, you must define the production domain of the store, the main URL customers will use to access your store.

> ⚠️ Before adding the domain, make sure the [external DNS settings](https://developers.vtex.com/docs/guides/faststore/go-live-1-configuring-external-dns) are correctly configured in your VTEX account settings.

The **Production domain** section allows you to set up the primary domain of your store by selecting it from the dropdown list in the **Host** field and adding it. For detailed instructions on this process, refer to [Setting up your Production Domain in WebOps](https://developers.vtex.com/docs/guides/faststore/how-to-set-production-domain).

#### Current domains

The **Current domains** section displays the default and primary domains configured for your store. This section serves as a reference to verify that your domains are correctly set up in WebOps. By checking this list, you can confirm whether your domains have been successfully added and are ready for use in the FastStore environment.

> ⚠️ If your domain isn't listed, there might be an issue with the configuration or DNS settings that you need to address before proceeding with the go-live. If you follow the [external DNS settings](https://developers.vtex.com/docs/guides/faststore/go-live-1-configuring-external-dns) guide correctly, and the problem persists, open a ticket with [VTEX Support](https://help.vtex.com/en/support).

### Variables and secrets

Variables and secrets are encrypted credentials, like API keys and passwords, that require secure management during FastStore deployment. Standardizing variables and secrets management via WebOps enhances security and consistency across deployment providers.

The **Variables and secrets** section allows you to add new variables and secrets by completing the `Type`, `Key`, and `Value` fields. For detailed instructions on managing variables and secrets, refer to [Managing variables and secrets](https://developers.vtex.com/docs/guides/faststore/webops-managing-variables-and-secrets).

> ℹ Learn more in [Managing variables and secrets](https://developers.vtex.com/docs/guides/faststore/webops-managing-variables-and-secrets).

#### Current keys

The **Current keys** section lists all variables and secrets configured for your store, along with their corresponding keys (identifiers). Variable values can be revealed or hidden using the visibility toggle, while secret values remain hidden for security. Existing variables and secrets can be updated or deleted from this section using the `⋮` menu. For detailed instructions on managing variables and secrets, refer to [Managing variables and secrets](https://developers.vtex.com/docs/guides/faststore/webops-managing-variables-and-secrets).

## Deleting the project

The FastStore project can be deleted by clicking **More actions** (`⋮`) and then **Delete project**. For detailed instructions on deleting a project, refer to [Deleting a FastStore WebOps Project](https://developers.vtex.com/docs/guides/faststore/how-to-delete-webops-project).

A modal to confirm your action will open.

> ⚠️ Proceed with caution. Deleting the project can't be undone. All deployments and associated domains will be permanently removed.

Was this feedback useful?

  • Yes
  • No

@github-actions

Copy link
Copy Markdown
Contributor

🏷️ Frontmatter errors

docs/faststore/docs/getting-started/webops/dashboard.mdx

Field issues

Field Error
updatedAt 'updatedAt' must be in ISO 8601 format (YYYY-MM-DDThh:mm:ss.sssZ).

Comment thread docs/faststore/docs/getting-started/1-setting-up-your-environment.mdx Outdated
Co-authored-by: Lucas Feijó <lucasfjportela@gmail.com>
@github-actions

Copy link
Copy Markdown
Contributor

🏷️ Frontmatter errors

docs/faststore/docs/getting-started/webops/dashboard.mdx

Field issues

Field Error
updatedAt 'updatedAt' must be in ISO 8601 format (YYYY-MM-DDThh:mm:ss.sssZ).

@github-actions

Copy link
Copy Markdown
Contributor

🔍 Documentation feedback for docs/faststore/docs/getting-started/overview.mdx

The provided document, titled "Getting started," deviates from the specified rules for Tutorial writing in several key areas, particularly concerning its structure and adherence to style guidelines. The document appears to function more as an overview or a learning track guide rather than a self-contained tutorial with actionable steps within the document itself.

1. General Feedback

The document is well-intentioned as an introductory piece for FastStore, but it fundamentally misaligns with the "Tutorial" structure defined by the rules. It lacks mandatory frontmatter fields, its title is not compliant, and most critically, it does not contain an "Instructions" section with sequential steps as required for a tutorial. Instead, it presents a list of links to other guides, which is more characteristic of a learning path or module overview. Additionally, there are several instances of subjective language, passive voice, contractions, and undefined acronyms that need correction to meet the style guide.

2. Actionable Feedback

Here are the specific areas that require changes:

  • Frontmatter:
    • title: The current title "Getting started" does not include the product name (FastStore), does not use a gerund verb, and is not specific enough about the learning objective.
    • slug: This mandatory field is missing. It should be a hyphenated, lowercase version of the title.
    • hidden: This mandatory field is missing. It should be set to false for a public tutorial.
    • createdAt: This mandatory field is missing.
    • excerpt: This field is not part of the standard Tutorial frontmatter. Its content should be integrated into the body's introduction.
  • Body Structure:
    • Introduction: The current introduction is split between the initial paragraph and the "What you'll build in this track" section. It should be a single, cohesive introduction that clearly states the learning objective, context, and what the reader will learn. The content from the excerpt should be moved here.
    • Before you begin section: This optional section is missing. While not mandatory, it's highly recommended for a "Getting started" tutorial to list prerequisites.
    • Instructions section: This is a mandatory section for tutorials and is completely missing. The WhatsNextCard components represent links to other tutorials/modules, not the steps within this specific tutorial. The rule states, "Each step's title starts with a verb in the gerund form." This document needs to contain actual, sequential steps for a specific task.
    • Summary and next steps section: This optional section is missing. It should summarize the tutorial's learning and suggest follow-up resources (which could be the other modules in the track).
  • Style Guide Adherence:
    • R1.1 (Clear, direct language without unnecessary adverbs or marketing speak):
      • "high-performance, customizable ecommerce websites" – "high-performance" and "customizable" are subjective marketing terms.
      • "production-ready storefront" – "production-ready" is subjective.
      • "manage and publish your store’s content efficiently." – "efficiently" is an unnecessary adverb.
    • R3.1 (Use active voice instead of passive voice):
      • "...you’ll have a production-ready storefront deployed..." should be rephrased to active voice, e.g., "you will deploy a production-ready storefront."
      • "...how the FastStore project is organized..." should be rephrased to active voice, e.g., "...how FastStore organizes the project."
    • R3.3 (Avoid subjective adjectives): "high-performance", "customizable", "production-ready" should be replaced with factual descriptions or removed.
    • R4.3 (Spell out acronyms on first use):
      • "CMS" is used without being spelled out (Content Management System).
      • "WebOps app" is used without being defined or spelled out.
    • R4.5 (Avoid contractions): "you’ll" should be replaced with "you will".

3. Suggested Revision

---
title: "Getting Started with FastStore: Building Your First Storefront"
slug: "getting-started-with-faststore-building-your-first-storefront"
hidden: false
createdAt: "2024-07-30T10:00:00Z"
updatedAt: "2026-03-27T11:30:00.813Z"
---

This tutorial guides you through the initial steps of building and deploying your first FastStore storefront from scratch. FastStore is a headless commerce storefront framework built on [Next.js](https://nextjs.org/) that enables you to build robust and tailored ecommerce websites. By the end of this tutorial, you will have prepared your development environment and started your first FastStore project locally. This is the first step in a comprehensive track that will lead you to a production-ready storefront deployed at `https://{accountName}.vtex.app/`, fully integrated with the Content Management System (CMS) for content management.

## Before you begin

Before proceeding with this tutorial, ensure you have the following:

*   A VTEX account.
*   Node.js (LTS version) installed on your machine.
*   Yarn or npm installed.
*   Basic knowledge of React and Next.js.

## Instructions

Here's an overview of the initial steps to get started with FastStore:

### 1. Setting up your development environment

To begin building with FastStore, you must prepare your local development environment and your VTEX account. This involves installing necessary tools and configuring your account.

1.  **Installing the VTEX CLI**: Open your terminal and run the following command to install the VTEX Command Line Interface (CLI):
    ```bash
    npm install -g vtex
    ```
2.  **Logging in to your VTEX account**: Authenticate the VTEX CLI with your account by running:
    ```bash
    vtex login {accountName}
    ```
    Replace `{accountName}` with your actual VTEX account name.
3.  **Installing the WebOps app**: Ensure the WebOps app is installed in your VTEX account. This app facilitates FastStore project creation and deployment. You can install it via the VTEX Admin or by running:
    ```bash
    vtex install vtex.webops@latest
    ```

### 2. Starting your FastStore project locally

After setting up your environment, you can create and run your first FastStore project.

1.  **Creating a new project**: Use the WebOps app onboarding flow to create your FastStore project. This process automatically sets up a GitHub repository and provides a live preview of your site. Follow the instructions in the VTEX Admin or use the `vtex webops init` command.
2.  **Cloning the repository**: Once the project is created, clone its GitHub repository to your local machine.
    ```bash
    git clone https://github.com/{your-org}/{your-repo}.git
    cd {your-repo}
    ```
3.  **Installing dependencies**: Navigate into your project directory and install the necessary dependencies:
    ```bash
    yarn install
    # or
    npm install
    ```
4.  **Running the project**: Start the local development server to preview your FastStore project in real time:
    ```bash
    yarn dev
    # or
    npm run dev
    ```
    Your storefront will typically be accessible at `http://localhost:3000`.

## Summary and next steps

In this tutorial, you have successfully set up your development environment and started your first FastStore project locally. You now have a basic understanding of the initial setup required to build with FastStore.

To continue your learning journey and further develop your storefront, explore the next modules in the FastStore track:

<Flex>
  <WhatsNextCard
    title="Understanding the project structure"
    description="Learn how the FastStore project is organized, including its main directories, configurations, and code architecture."
    linkTo="https://developers.vtex.com/docs/guides/faststore/getting-started-4-understanding-the-project-structure"
    linkTitle="See more"
  />
  <WhatsNextCard
    title="Integrating your project with CMS"
    description="Connect your FastStore project with the Content Management System (CMS) to manage and publish your store’s content."
    linkTo="https://developers.vtex.com/docs/guides/faststore/getting-started-5-integrating-cms"
    linkTitle="See more"
  />
  <WhatsNextCard
    title="Optimizing your store"
    description="Discover additional resources and best practices to optimize your store’s performance and user experience."
    linkTo="https://developers.vtex.com/docs/guides/faststore/getting-started-6-next-steps"
    linkTitle="See more"
  />
</Flex>

Was this feedback useful?

  • Yes
  • No

@github-actions

Copy link
Copy Markdown
Contributor

🏷️ Frontmatter errors

docs/faststore/docs/getting-started/webops/dashboard.mdx

Field issues

Field Error
updatedAt 'updatedAt' must be in ISO 8601 format (YYYY-MM-DDThh:mm:ss.sssZ).

Comment thread docs/faststore/docs/getting-started/webops/dashboard.mdx Outdated
@github-actions

github-actions Bot commented Apr 2, 2026

Copy link
Copy Markdown
Contributor

🏷️ Frontmatter errors

docs/faststore/docs/getting-started/webops/dashboard.mdx

Field issues

Field Error
updatedAt 'updatedAt' must be in ISO 8601 format (YYYY-MM-DDThh:mm:ss.sssZ).

Comment thread docs/faststore/docs/getting-started/1-setting-up-your-environment.mdx Outdated
Comment thread docs/faststore/docs/getting-started/2-starting-the-project.mdx Outdated
Comment thread docs/faststore/docs/getting-started/3-running-the-project-locally.mdx Outdated
Comment thread docs/faststore/docs/getting-started/glossary.mdx Outdated
Co-authored-by: Bárbara Celi <112641072+barbara-celi@users.noreply.github.com>
Comment thread docs/faststore/docs/getting-started/1-setting-up-your-environment.mdx Outdated
Co-authored-by: Mariana Caetano Pereira <67270558+mariana-caetano@users.noreply.github.com>
@github-actions

github-actions Bot commented Apr 6, 2026

Copy link
Copy Markdown
Contributor

🏷️ Frontmatter errors

docs/faststore/docs/getting-started/webops/dashboard.mdx

Field issues

Field Error
updatedAt 'updatedAt' must be in ISO 8601 format (YYYY-MM-DDThh:mm:ss.sssZ).

Comment thread docs/faststore/docs/getting-started/2-starting-the-project.mdx
Comment thread docs/faststore/docs/getting-started/2-starting-the-project.mdx Outdated
Co-authored-by: Mariana Caetano Pereira <67270558+mariana-caetano@users.noreply.github.com>
@github-actions

Copy link
Copy Markdown
Contributor

🏷️ Frontmatter errors

docs/faststore/docs/getting-started/webops/dashboard.mdx

Field issues

Field Error
updatedAt 'updatedAt' must be in ISO 8601 format (YYYY-MM-DDThh:mm:ss.sssZ).

Comment thread docs/faststore/docs/getting-started/2-starting-the-project.mdx Outdated
@github-actions

Copy link
Copy Markdown
Contributor

🏷️ Frontmatter errors

docs/faststore/docs/getting-started/webops/dashboard.mdx

Field issues

Field Error
updatedAt 'updatedAt' must be in ISO 8601 format (YYYY-MM-DDThh:mm:ss.sssZ).

Comment thread docs/faststore/docs/getting-started/2-starting-the-project.mdx Outdated
Co-authored-by: Mariana Caetano Pereira <67270558+mariana-caetano@users.noreply.github.com>
@github-actions

Copy link
Copy Markdown
Contributor

🏷️ Frontmatter errors

docs/faststore/docs/getting-started/webops/dashboard.mdx

Field issues

Field Error
updatedAt 'updatedAt' must be in ISO 8601 format (YYYY-MM-DDThh:mm:ss.sssZ).

@mariana-caetano
mariana-caetano merged commit 06bc70c into main May 18, 2026
4 checks passed
@mariana-caetano
mariana-caetano deleted the EDU-17893 branch May 18, 2026 17:20
Sign up for free to join this conversation on GitHub. Already have an account? Sign in to comment

Labels

None yet

Projects

None yet

Development

Successfully merging this pull request may close these issues.

3 participants