![]()
A powerful and easy-to-use Python library for seamless integration with the Diagral alarm system.


![]()
![]()
Welcome to the documentation for pydiagral, a Python library for interacting with the Diagral API.
pydiagral is an asynchronous Python interface for the Diagral alarm system. This library allows users to control and monitor their Diagral alarm system through the official API.
Caution
Please note that the Diagral alarm system is a security system, and it may be preferable not to connect it to any automation platform for security reasons.
In no event shall the developer of pydiagral library be held liable for any issues arising from the use of this pydiagral library.
The user installs and uses this integration at their own risk and with full knowledge of the potential implications.
To use this library, which leverages the Diagral APIs, you must have a Diagral box (DIAG56AAX). This box connects your Diagral alarm system to the internet, enabling interaction with the alarm system via the API. You can find more information about the Diagral box here.
The DiagralAPI class offers the following functionalities:
-
Authentication:
- Connect to the Diagral API with username and password
- Manage access tokens and their expiration
- Create, validate, and delete API keys
-
System Configuration:
- Retrieve alarm configuration
-
System Information:
- Obtain system details
- Retrieve the current system status
- Manage webhooks
- Manage anomalies
-
System Interraction:
- Activate or Desactivate system (partially or globally)
- Automatism actions
To get started with pydiagral, follow these steps:
-
Installation:
pip install pydiagral
-
Example
A modular and easy-to-use test script is available example_code.py to help you get started with the library.
Simply create a .env file with the following content:
USERNAME[email protected]
PASSWORD=your_password
SERIAL_ID=your_serial_id
PIN_CODE=your_pin_code
LOG_LEVEL=DEBUG
And run the example_code.py.
Tip
You can customize the actions performed by example_code.py by modifying the parameters in the code, as indicated by the CUSTOMIZE THE TESTS section title.
Library documentation is available here.
For detailed library documentation, please refer to the following sections:
- API Reference: Comprehensive documentation of the DiagralAPI class and its methods
- Data Models: Description of the data structures used
- Exceptions: List of package exceptions
Official Diagral API is available here.
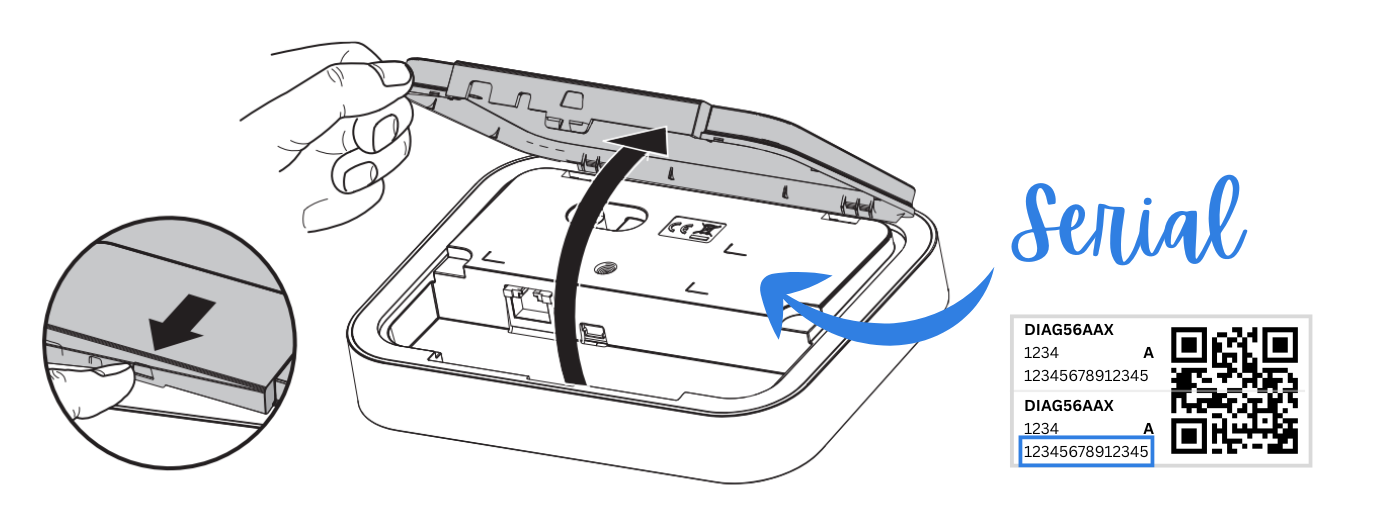
The serial number can only be found with physical access to the box. You need to open it, and you will find a label with a QR Code.
On this label, there is a 14-character code that represents the serial number of the box.
Important
This code is necessary to use this library and Diagral API.
Contributions are welcome! Here are several ways you can contribute:
- Submit Pull Requests: Review open PRs, and submit your own PRs.
- Report Issues: Submit bugs found or log feature requests.
Contributing Guidelines
- Fork the Repository: Start by forking the project repository to your GitHub account.
- Clone Locally: Clone the forked repository to your local machine using a Git client.
git clone https://github.com/mguyard/pydiagral
- Create a New Branch: Always work on a new branch, giving it a descriptive name.
git checkout -b new-feature-x
- Make Your Changes: Develop and test your changes locally.
- Commit Your Changes: Commit your changes with a clear and concise message that follows the Conventional Commits guidelines.
git commit -m 'feat: Implemented new feature x.' - Push to GitHub: Push the changes to your forked repository.
git push origin new-feature-x
- Submit a Pull Request: Create a PR against the original project repository. Clearly describe the changes and their motivations.
Once your PR is reviewed and approved, it will be merged into the beta branch. After final testing, it will be merged into the main branch.
pydiagral is distributed under the GPL-v3 License. See the LICENSE file for more details.