
➡️ At first, import libraries that installed with pip install command.
import cv2                                           # main librarie
import requests                                      # To load image from url
import numpy as np                                   # To works with arrays
from PIL import Image                                # To works with images
from io import BytesIO                               # To read data from memory
import matplotlib.pyplot as plt                      # To plot images
import ipywidgets                                    # To use load and predict buttons
from IPython.display import display,clear_output # To use load and predict buttons➡️ Using requests and PIL to load an image from an URL and show it.
response = requests.get('https://i.postimg.cc/kGqWpBM3/page2.jpg')
img = Image.open(BytesIO(response.content))

# show imported image
plt.imshow(img)
plt.axis('off')
plt.show()
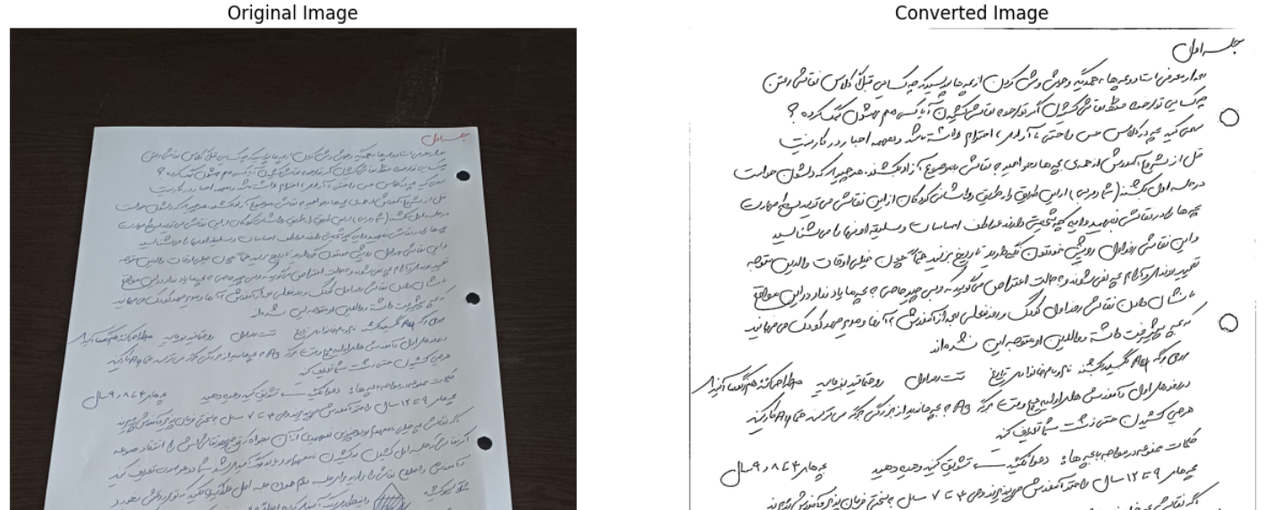
➡️ Now, define a function to recive imported images and get cam-scanner like image to output.
def CamScanner(img) :
    # Convert imported image to a numpy array
    img = np.array(img)

    # Change image to GrayScale with 1 color channel
    gray = cv2.cvtColor(img, cv2.COLOR_BGR2GRAY)

    # Using threshold create a mask
    _, mask_page = cv2.threshold(gray, 150, 255, cv2.THRESH_BINARY)

    # create contours of mask
    countours, _ = cv2.findContours(mask_page, cv2.RETR_EXTERNAL, cv2.CHAIN_APPROX_SIMPLE)

    # define 2 list to store area and P factor
    area_list = []
    p_list = []

    # Loop over contours to store area and arcLength in lists
    for cont in countours :
        area = cv2.contourArea(cont)
        area_list.append(area)

        p = cv2.arcLength(cont, True)
        p_list.append(p)

    # Choose bigest elemnt index
    page_index = np.argmax(area_list)

    # Create closed curve over choosed contours
    RasPoz = cv2.approxPolyDP(curve=countours[page_index], epsilon=0.005*p_list[page_index], closed=True)

    # Create a condition to insure to choose a rectangle(page)
    if len(RasPoz) == 4 :
        RasPoz_reshaped = np.reshape(RasPoz, (4, 2))

        # Image hight and width
        h, w, _ = img.shape

        # Choose point1 of current page edges and point2 of output edges ---> for Prespective
        p1 = np.float32(RasPoz_reshaped)
        p2 = np.float32([ [0, 0], [0, h], [w, h], [w, 0] ])

        # Create a prespective array with p1 & p2
        arr_pres = cv2.getPerspectiveTransform(p1, p2)

        # Apply prespective on original image
        selected_page = cv2.warpPerspective(img, arr_pres, (w, h))

        # Change color map of selected image to gray
        selected_gray = cv2.cvtColor(selected_page, cv2.COLOR_BGR2GRAY)

        # Apply an adaptive threshold to gray-selected-image to make it more readable
        adaptive_selected = cv2.adaptiveThreshold(selected_gray, 255, cv2.ADAPTIVE_THRESH_GAUSSIAN_C, cv2.THRESH_BINARY, 15, 12)

        # Show original and output image of function
        plt.figure(figsize=(15, 10))
        # Original image
        plt.subplot(1, 2, 1)
        plt.imshow(img)
        plt.title('Original Image')
        plt.axis('off')
        # Converted image
        plt.subplot(1, 2, 2)
        plt.imshow(adaptive_selected, cmap='gray')
        plt.title('Converted Image')
        plt.axis('off')

        plt.show()
# Call the Function
CamScanner(img)
➡️ This part not working in kaggle environment, but if you download and run this notebook on your system, it works !
# Create Upload button by ipywidget

upload = ipywidgets.FileUpload(accept='.jpg', multiple=False)
display(upload)
FileUpload(value=(), accept='.jpg', description='Upload')
button = ipywidgets.Button(description='Predict')
out = ipywidgets.Output()
def on_button_clicked(_):
    with out:
        clear_output()
        try:
            data = BytesIO(upload.value[0]['content'])
            img = Image.open(data)
            CamScanner(img)

        except:
            print('No Image Uploaded/Invalid Image File')
button.on_click(on_button_clicked)
ipywidgets.VBox([button,out])
VBox(children=(Button(description='Predict', style=ButtonStyle()), Output()))
✅ If you like my notebook, please upvote it ✅