MIGRATING THE ANALYSIS SPECIFIC BITS FROM 'daylily' here, and the AWS infra stuff to daylily-ephemeral-cluster
(stable tagged release to use --> 0.7.213 ... use main at own risk)
beta release
daylily-omics-analysisare a set of bioinformatics analyses worflows which run on several short read and long read sequencing data, as well as hybrid combinations of these. It's primary objective is to enhance the reproducibility and predictability of bioinformatics compute performance, and importantly, cost. It leverages daylily-ephemeral-cluster in order to meet this objective.

The goal of daylily is to enable more rigorous comparisons of informatics tools by formalizing their compute environments and establishing hardware profiles that reproduce each tool’s accuracy and runtime/cost performance. This approach is general, not tied to a single toolset; while AWS is involved, nothing prevents deployment elsewhere. AWS simply offers a standardized hardware environment accessible to anyone with an account. By “compute environment,” I mean more than a container—containers alone don’t guarantee hardware performance, and cost/runtime considerations demand reproducibility on specific hardware. Though daylily uses containers and conda, it remains agnostic about the tools themselves. I have three main aims:
Move away from unhelpful debates over “the best” tool and toward evidence-based evaluations. Real use cases dictate tool choice, so let’s make sure relevant data and clear methodologies are accessible—or at least ensure enough detail is published to make meaningful comparisons. Specifically, I wish to move away from scant and overly reductive metrics which fail to describe our tools in as rich detail as they can be. ie:
If I am looking for the best possible
recallin SNV calling, initial data suggestes I might look towardssentieon bwa+sentieon DNAscope... and interestingly, if I wanted the best possibleprecision, it would be worth investigatingstrobealigner+deepvariant(REF DATA).Fscorewould not be as informative for these more sepcific cases.
Demand better metrics and documentation in tool publications: thorough cost data, specific and reproducible hardware details, more nuanced concordance metrics, and expansive QC reporting. Half-measures shouldn’t pass as “sufficient.”
They were helpful at first, but our field is stuck in 2012. We need shareable frameworks that capture both accuracy and cost/runtime for truly reproducible pipeline performance—so we can finally move forward.
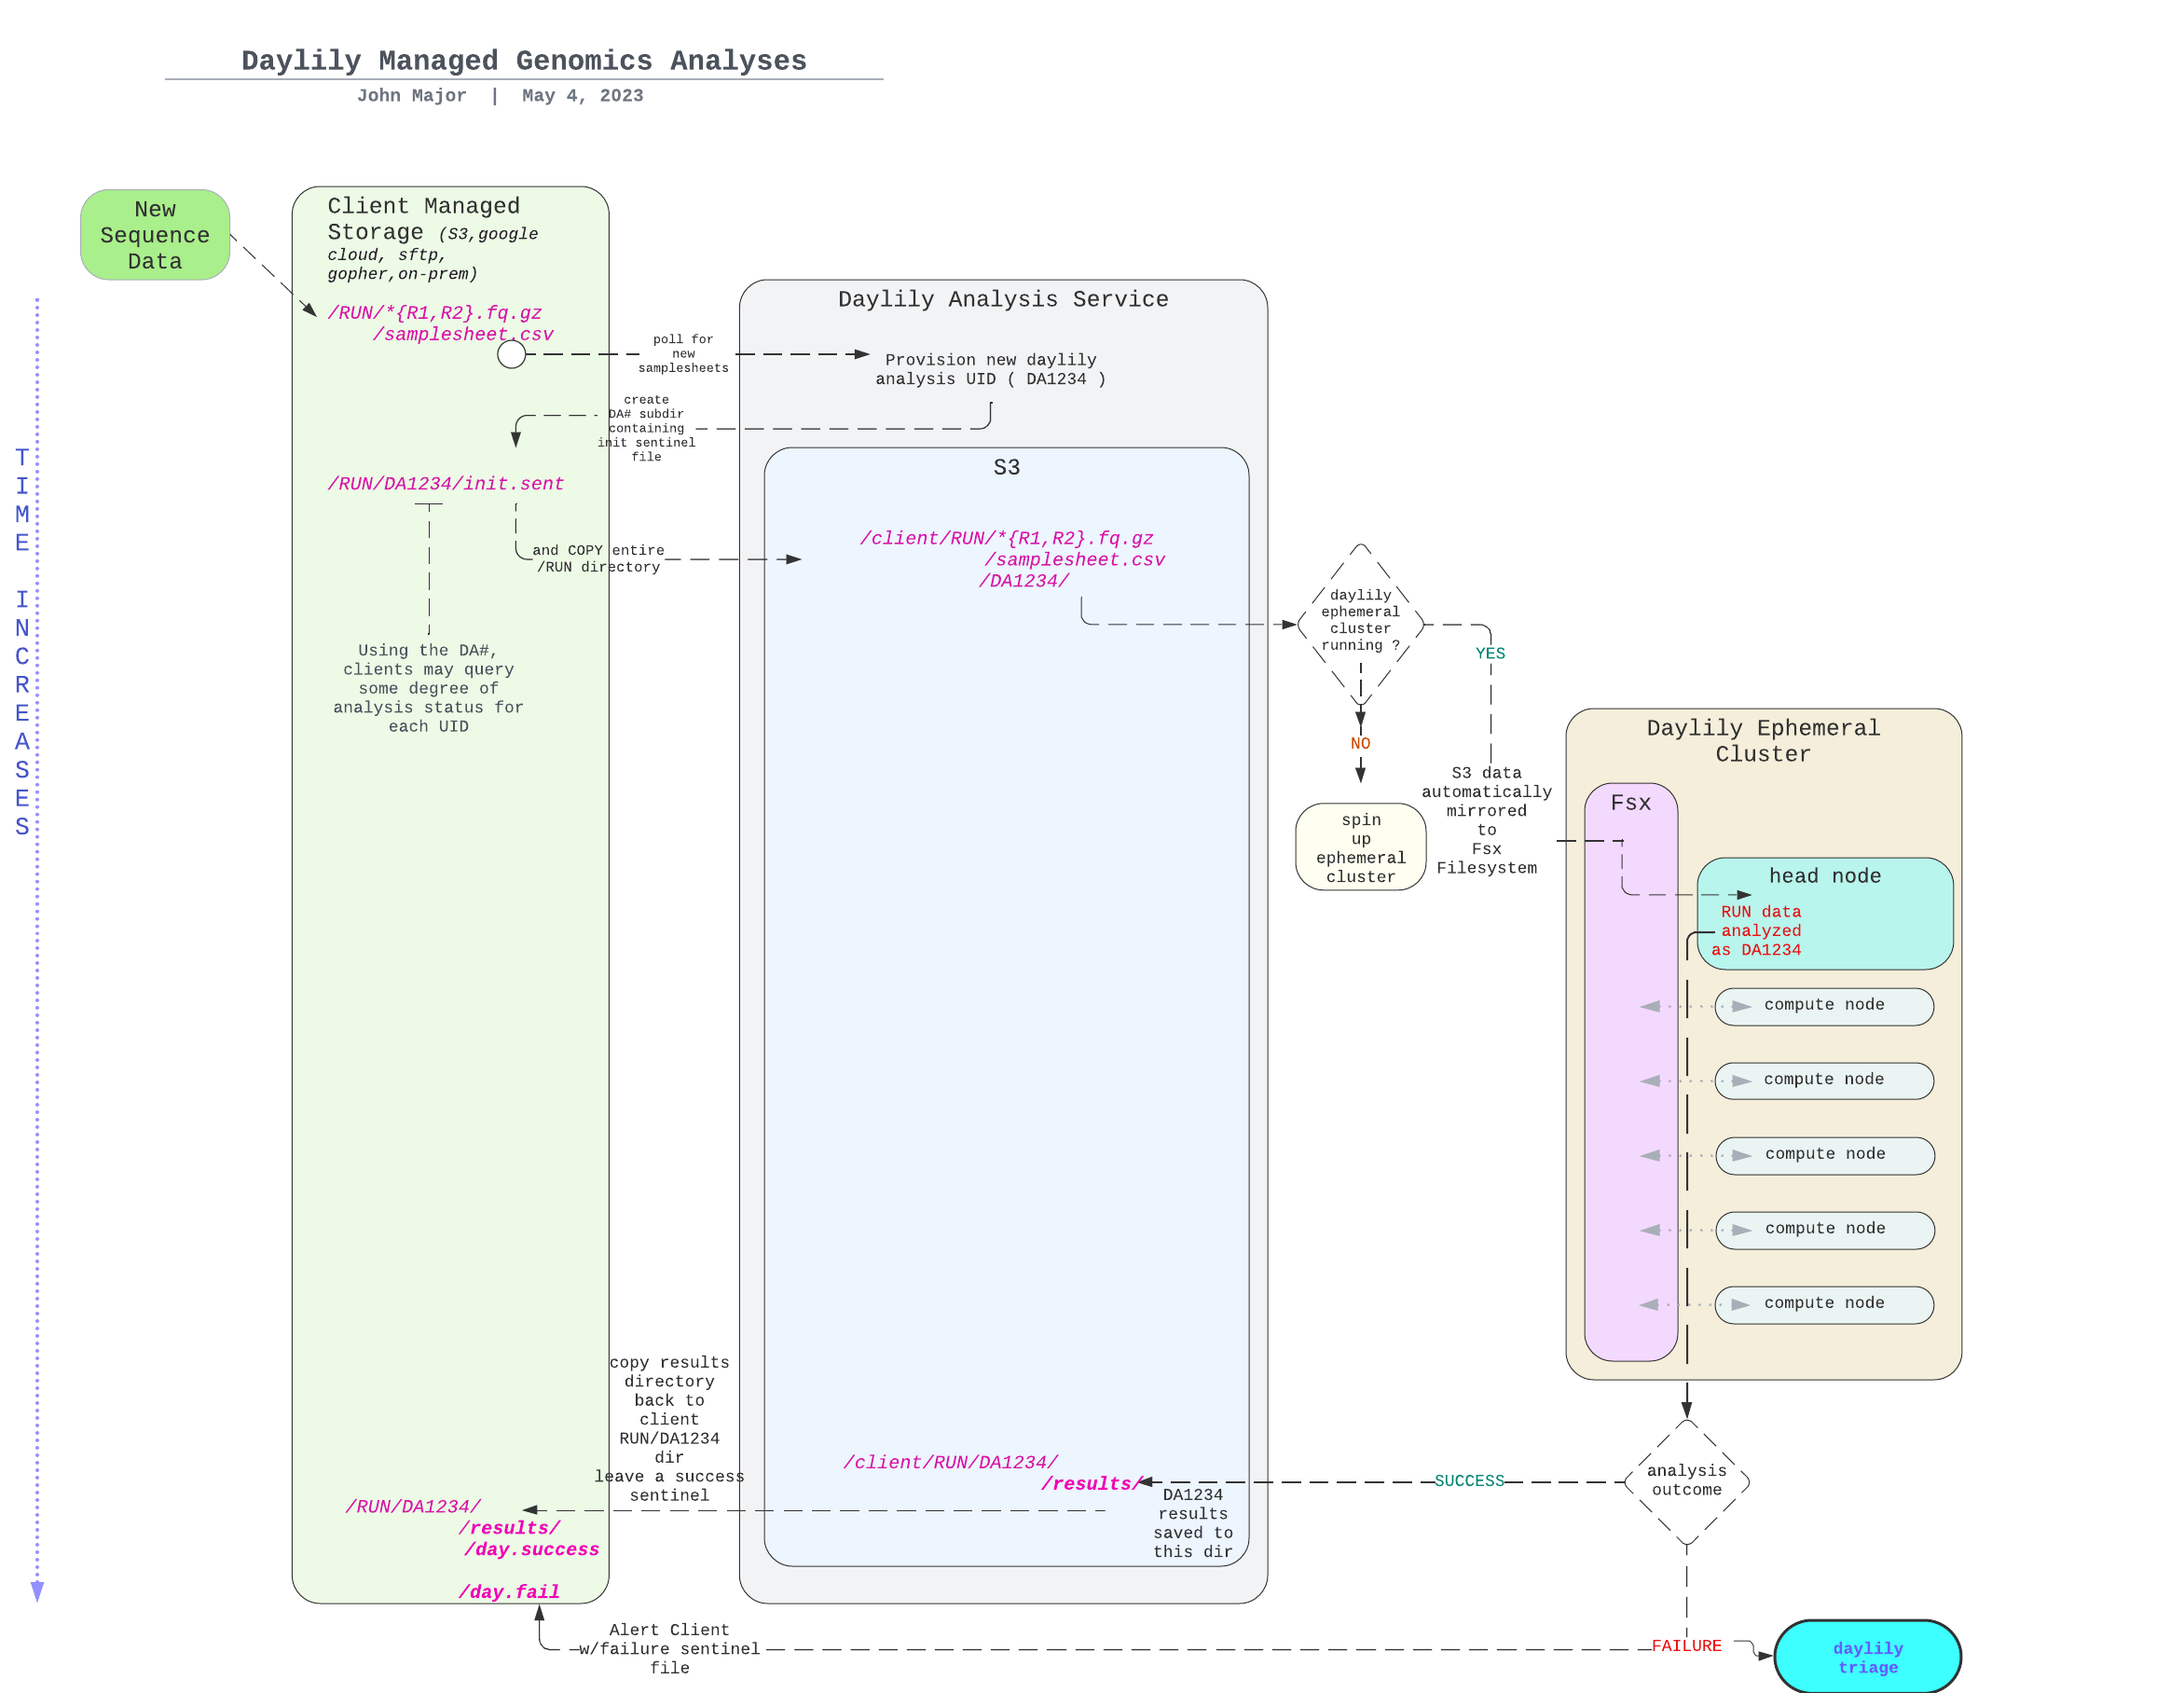
The daylily GIAB analyses repository contains (work in progress) results from the first stable daylily release, run on seven GIAB samples.
The daylily GIAB analyses repo will holds the (WIP) analsis from reuslts of the first stable release of
daylilyrunning on 7 GIAB samples.
Drafting in progress, with the intention of publishing the results in f1000-research.
In order to demonstrate the capabilities of daylily, I am processing the 7 GIAB datasets vs: 3 aligners, 1 deduper, 5 SNV callers and 3 SV callers (plus generating concordance results and a variety of qc data), for both b37 and hg38, which yields:
- 41 BAMs
- 210 SNV vcfs
- 129 SV vcfs
- 2 multiqc reports (per reference)
- many qc data files
- COST reporting for every task
I will be assessing:
- Infrastructure management aspects of daylily.
- Impact on accuracy and cost of all the combinations of above tools.
- costs (spoiler: best performance is in the $3-4/sample is reasonably to assume) of compute, data transfer, data storage & long term data storage.
- fscore (spoiler: as expected performance acheivable of 0.998+)
- Globally, raising questions about bfx analysis reproducibility, best practices vs. best performance/accuracy, ...
Would you like to lend a hand? contact me
BFAIR: Bioinformatics FAIR Principles
this is a title rough idea! - not likely final, but is the gist of it
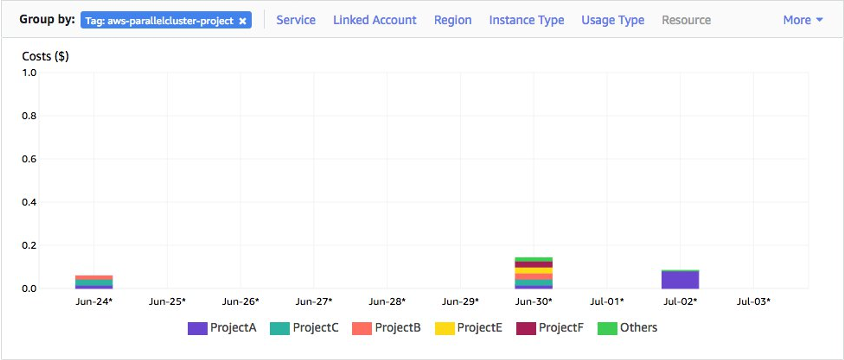
Comprehensive Cost Transparency & Predictability (wip: interactive cost calculator is available here)
30x FASTQ->VCF, in 1hr, for
~$3 - $4
Be up and running in a few hours from reading this sentence.
- Have your first GIAB 30x Fastq->VCF (both snv and sv) ~60min later.
- The (onetime) cost of staging data is ~$20, analysis will be
~$3.00 to $5.00(pricing is established dynamically at cluster creation, and you can inspect the max bound on spot prices which are possible, this sets your upper bound... as does complexity of pipeline, but more on that latter).
Time to result, Cost of analysis, Accuracy && Integrated Concordance/Comparison: These are key elements required in making solid analysis decisions, and in setting the stage for analysis decisions which can improve in tandem as the field advances.
Cost Optimization & Predictability: With benchmarked, reproducible analysis on stable and reproducible computing platforms, it is possible to optimze for the most beneficial compute locale && to predict expected (and bound highest) per-sample cost to analyze.
Cost Transparency & Management: IRT views into what is being spent, and where. Not just compute, but data transfer, sroage, and other ALL other costs. No specialized hardware investment needed, no contracts, pay for what you use.
Pro Open Source: All out of the box functionality here is open source, and does not require any investment in software liscneces, etc. This is important for both future proof reproducibility and ongoing cost management. This said, daylily is not hostile to s/w that requires liscences (if selection of closed s/w is made understanding tradeoffs, if any, in long term reproducibility), but you will need to purchase those separately.
- https://github.com/aws/aws-parallelcluster makes the cluster creation/management possible.
- snakemake
- all the tools!

Daylily development has been under development for a number of years & is self-funded work (both time, and AWS costs).
- I am available for consulting engagements if you are interested in extending the work here. My areas of expertise also include cllical diagnostics operations, regulatory and compliance.
IT IS ASSUMED YOU HAVE A RUNNING EPHEMERAL CLUSTER AND KNOW HOW TO SSH INTO IT (via a terminal, the PCUI shell, or EC2 console SSM)
From your local shell, you can ssh into the head node of the cluster using the following command.
ssh -i $pem_file ubuntu@$cluster_ip_address export AWS_PROFILE=<profile_name>
bin/daylily-ssh-into-headnode
Is daylily CLI Available & Working
cd ~/projects/daylily
. dyinit # inisitalizes the daylily cli
dy-a local hg38 # activates the local config using reference hg38, the other build available is b37
if
. dyinitworks, butdy-a localfails, trydy-b BUILD
This should produce a magenta WORKFLOW SUCCESS message and RETURN CODE: 0 at the end of the output. If so, you are set. If not, see the next section.
If there is no ~/projects/daylily directory, or the dyinit command is not found, the headnode configuration is incomplete.
Attempt To Complete Headnode Configuration From your remote terminal that you created the cluster with, run the following commands to complete the headnode configuration.
conda activate DAYCLI

./bin/daylily-cfg-headnode $PATH_TO_PEM $CLUSTER_AWS_REGION $AWS_PROFILE
If the problem persists, ssh into the headnode, and attempt to run the commands as the ubuntu user which are being attempted by the
daylily-cfg-headnodescript.
Confirm /fsx/ directories are present
ls -lth /fsx/

total 130K
drwxrwxrwx 3 root root 33K Sep 26 09:22 environments
drwxr-xr-x 5 root root 33K Sep 26 08:58 data
drwxrwxrwx 5 root root 33K Sep 26 08:35 analysis_results
drwxrwxrwx 3 root root 33K Sep 26 08:35 resourcesday-clone will be available on your path as long as conda is activated. This script will create a new named analysis directory in /fsx/analysis_results/ubuntu/ named the string specified in the -d flag. It will use defaults to clone this repo into the new analysis dir (to override defaults, run with -h).
day-clone --help

# create new analysis dir and clone daylily into it
day-clone -d first_analysis
echo "TO MOVE TO YOUR NEW ANALYSIS DIRECTORY, run:"
echo  "        bash"
echo  "        cd /fsx/analysis_results/ubuntu/fist_analysis/daylily"

# move to your new analysis dir
bash
cd /fsx/analysis_results/ubuntu/first_analysis/daylily
note: if you have an active DAY conda env, begina fresh bash shell from your new analysis dir,
bash.
. dyinit  --project PROJECT

dy-a local hg38 # the other option: b37 ( or set via config command line below)

head -n 2 .test_data/data/giab_30x_hg38_analysis_manifest.csv

export DAY_CONTAINERIZED=false # or true to use pre-built container of all analysis envs. false will create each conda env as needed

dy-r produce_deduplicated_bams -p -j 2 --config genome_build=hg38 aligners=['bwa2a','sent'] dedupers=['dppl'] -n # dry run
dy-r produce_deduplicated_bams -p -j 2 --config genome_build=hg38 aligners=['bwa2a','sent'] dedupers=['dppl'] The -j flag specified in dy-r limits the number of jobs submitted to slurm. For out of the box settings, the advised range for -j is 1 to 10. You may omit this flag, and allow submitting all potnetial jobs to slurm, which slurm, /fsx, and the instances can handle growing to the 10s or even 100 thousands of instances... however, various quotas will begin causing problems before then. The local defauly is set to -j 1 and slurm is set to -j 10, -j may be set to any int > 0.
This will produce a job plan, and then begin executing. The sample manifest can be found in .test_data/data/0.01x_3_wgs_HG002.samplesheet.csv (i am aware this is not a .tsv :-P ). Runtime on the default small test data runnin locally on the default headnode instance type should be ~5min.
NOTE! NOTE !! NOTE !!! ---- The Undetermined Sample Is Excluded. Set --config keep_undetermined=1 to process it.
Building DAG of jobs...
Creating conda environment workflow/envs/vanilla_v0.1.yaml...
Downloading and installing remote packages.
Environment for /home/ubuntu/projects/daylily/workflow/rules/../envs/vanilla_v0.1.yaml created (location: ../../../../fsx/resources/environments/conda/ubuntu/ip-10-0-0-37/f7b02dfcffb9942845fe3a995dd77dca_)
Creating conda environment workflow/envs/strobe_aligner.yaml...
Downloading and installing remote packages.
Environment for /home/ubuntu/projects/daylily/workflow/rules/../envs/strobe_aligner.yaml created (location: ../../../../fsx/resources/environments/conda/ubuntu/ip-10-0-0-37/a759d60f3b4e735d629d60f903591630_)
Using shell: /usr/bin/bash
Provided cores: 16
Rules claiming more threads will be scaled down.
Provided resources: vcpu=16
Job stats:
job                          count    min threads    max threads
-------------------------  -------  -------------  -------------
doppelmark_dups                  1             16             16
pre_prep_raw_fq                  1              1              1
prep_results_dirs                1              1              1
produce_deduplicated_bams        1              1              1
stage_supporting_data            1              1              1
strobe_align_sort                1             16             16
workflow_staging                 1              1              1
total                            7              1             16
This should exit with a magenta success message and
RETURN CODE: 0. Results can be found inresults/day/{hg38,b37}.
The following will submit jobs to the slurm scheduler on the headnode, and spot instances will be spun up to run the jobs (modulo limits imposed by config and quotas).
First, create a working directory on the /fsx/ filesystem.
init daylily, activate an analysis profile, set genome, stage an analysis_manigest.csv and run a test workflow.
# create a working analysis directory & clone daylily
day-clone -d first_analysis

bash
cd /fsx/analysis_results/first_analysis/daylily # this command is provided from day-clone

#  prepare to run the test
tmux new -s slurm_test
. dyinit
dy-a slurm hg38 # the other options being b37

# create a test manifest for one giab sample only, which will run on the 0.01x test dataset
head -n 2 .test_data/data/0.01xwgs_HG002_hg38.samplesheet.csv > config/analysis_manifest.csv

export DAY_CONTAINERIZED=false # or true to use pre-built container of all analysis envs. false will create each conda env as needed

# run the test, which will auto detect the analysis_manifest.csv file & will run this all via slurm
dy-r produce_snv_concordances -p -k -j 2 --config genome_build=hg38 aligners=['bwa2a'] dedupers=['dppl'] snv_callers=['deep'] -n
Which will produce a plan that looks like.
Job stats:
job                           count    min threads    max threads
--------------------------  -------  -------------  -------------
deep_concat_fofn                  1              2              2
deep_concat_index_chunks          1              4              4
deepvariant                      24             64             64
doppelmark_dups                   1            192            192
dv_sort_index_chunk_vcf          24              4              4
pre_prep_raw_fq                   1              1              1
prep_deep_chunkdirs               1              1              1
prep_for_concordance_check        1             32             32
prep_results_dirs                 1              1              1
produce_snv_concordances          1              1              1
stage_supporting_data             1              1              1
strobe_align_sort                 1            192            192
workflow_staging                  1              1              1
total                            59              1            192
Run the test with:
dy-r produce_snv_concordances -p -k -j 6 --config genome_build=hg38 aligners=['bwa2a'] dedupers=['dppl'] snv_callers=['deep'] # -j 6 will run 6 jobs in parallel max, which is done here b/c the test data runs so quickly we do not need to spin up one spor instance per deepvariant job & since 3 dv jobs can run on a 192 instance, this flag will limit creating only 2 instances at a time.note1: the first time you run a pipeline, if the docker images are not cached, there can be a delay in starting jobs as the docker images are cached. They are only pulled 1x per cluster lifetime, so subsequent runs will be faster.
note2: The first time a cold cluster requests spot instances, can take some time (~10min) to begin winning spot bids and running jobs. Hang tighe, and see below for monitoring tips.
ALERT The analysis_manifest.csv is being re-worked to be more user friendly. The following will continue to work, but will be repleaced with a less touchy method soon.
You may repeat the above, and use the pre-existing analysis_manifest.csv template .test_data/data/giab_30x_hg38_analysis_manifest.csv.
tmux new -s slurm_test_30x_single

# Create new analyiss dir
day-clone -d slurmtest
bash
cd /fsx/analysis_results/slurmtest/daylily # this command is provided from day-clone


. dyinit  --project PROJECT
dy-a slurm hg38 # the other option being b37

# TO create a single sample manifest
head -n 2 .test_data/data/giab_30x_hg38_analysis_manifest.csv > config/analysis_manifest.csv

export DAY_CONTAINERIZED=false # or true to use pre-built container of all analysis envs. false will create each conda env as needed

dy-r produce_snv_concordances -p -k -j 10 --config genome_build=hg38 aligners=['bwa2a'] dedupers=['dppl'] snv_callers=['deep'] -n  # dry run

dy-r produce_snv_concordances -p -k -j 10  --config genome_build=hg38 aligners=['bwa2a'] dedupers=['dppl'] snv_callers=['deep'] # run jobs, and wait for completion
Specify A Multi-Sample Manifest (in this case, all 7 GIAB samples) - 2 aligners, 1 deduper, 2 snv callers
tmux new -s slurm_test_30x_multi

# Create new analyiss dir
day-clone -d fulltest
bash
cd /fsx/analysis_results/fulltest/daylily # this command is provided from day-clone


. dyinit  --project PROJECT
dy-a slurm hg38 # the other options being b37

# copy full 30x giab sample template to config/analysis_manifest.csv
cp .test_data/data/giab_30x_hg38_analysis_manifest.csv  config/analysis_manifest.csv

export DAY_CONTAINERIZED=false # or true to use pre-built container of all analysis envs. false will create each conda env as needed

dy-r produce_snv_concordances -p -k -j 10 --config genome_build=hg38 aligners=['strobe,'bwa2a'] dedupers=['dppl'] snv_callers=['oct','deep'] -n  # dry run

dy-r produce_snv_concordances -p -k -j 10 --config genome_build=hg38 aligners=['strobe','bwa2a'] dedupers=['dppl'] snv_callers=['oct','deep']
max_snakemake_tasks_active_at_a_time=2 # for local headnode, maybe 400 for a full cluster
dy-r produce_snv_concordances produce_manta produce_tiddit produce_dysgu produce_kat produce_multiqc_final_wgs -p -k -j $max_snakemake_tasks_active_at_a_time --config genome_build=hg38 aligners=['strobe','bwa2a','sent'] dedupers=['dppl'] snv_callers=['oct','sentd','deep','clair3','lfq2'] sv_callers=['tiddit','manta','dysgu'] -nThe analysis_manifest.csv file is required to run the daylily pipeline. It should only be created via the helper script ./bin/daylily-analysis-samples-to-manifest-new.
this script is still in development, more docs to come, run with -h for now and see the example etc/analysis_samples.tsv template file for the format of the analysis_samples.tsv file. You also need to have a valid ephemeral cluster available.
TODO document this
The references supported via cloning public references s3 bucket are b37, hg38, hg38_broad. You specify a reference build by setting export DAY_GENOME_BUILD=hg38 and/or when activating a compute environment, ie: dy-a slurm hg38. dy-g hg38 will also do the trick.
- with no alt contigs.
- with no alt contigs.
- all contigs
- The build will direct daylily to choose the correct
config/supporting_files/${DAY_GENOME_BUILD}_suppoting_files.yamlwhich contain the paths to resources specific to the build.
- All reference files can be found here for the build.
- All annotation files can be found here for the build
- Each build has it's own results subdirectory.
Once jobs begin to be submitted, you can monitor from another shell on the headnode(or any compute node) with:
# The compute fleet, only nodes in state 'up' are running spots. 'idle' are defined pools of potential spots not bid on yet.
sinfo
PARTITION AVAIL  TIMELIMIT  NODES  STATE NODELIST
i8*          up   infinite     12  idle~ i8-dy-gb64-[1-12]
i32          up   infinite     24  idle~ i32-dy-gb64-[1-8],i32-dy-gb128-[1-8],i32-dy-gb256-[1-8]
i64          up   infinite     16  idle~ i64-dy-gb256-[1-8],i64-dy-gb512-[1-8]
i96          up   infinite     16  idle~ i96-dy-gb384-[1-8],i96-dy-gb768-[1-8]
i128         up   infinite     28  idle~ i128-dy-gb256-[1-8],i128-dy-gb512-[1-10],i128-dy-gb1024-[1-10]
i192         up   infinite      1  down# i192-dy-gb384-1
i192         up   infinite     29  idle~ i192-dy-gb384-[2-10],i192-dy-gb768-[1-10],i192-dy-gb1536-[1-10]

# running jobs, usually reflecting all running node/spots as the spot teardown idle time is set to 5min default.
squeue
             JOBID PARTITION     NAME     USER ST       TIME  NODES NODELIST(REASON)
                 1      i192 D-strobe   ubuntu PD       0:00      1 (BeginTime)
# ST = PD is pending
# ST = CF is a spot has been instantiated and is being configured
# PD and CF sometimes toggle as the spot is configured and then begins running jobs.

 squeue
             JOBID PARTITION     NAME     USER ST       TIME  NODES NODELIST(REASON)
                 1      i192 D-strobe   ubuntu  R       5:09      1 i192-dy-gb384-1
# ST = R is running


# Also helpful
watch squeue

# also for the headnode
glancesYou can not access compute nodes directly, but can access them via the head node. From the head node, you can determine if there are running compute nodes with squeue, and use the node names to ssh into them.
ssh i192-dy-gb384-1warning: this will delete all resources created for the ephemeral cluster, importantly, including the fsx filesystem. You must export any analysis results created in /fsx/analysis_results from the fsx filesystem back to s3 before deleting the cluster.
- During cluster config, you will choose if Fsx and the EBS volumes auto-delete with cluster deletion. If you disable auto-deletion, these idle volumes can begin to cost a lot, so keep an eye on this if you opt for retaining on deletion.
Run:
./bin/daylily-export-fsx-to-s3 <cluster_name> <region> <export_path:analysis_results>- export_path should be
analysis_resultsor a subdirectory ofanalysis_results/*to export successfully. - The script will run, and report status until complete. If interrupted, the export will not be halted.
- You can visit the FSX console, and go to the Fsx filesystem details page to monitor the export status in the data repository tab.
- Go to the 'fsx' AWS console and select the filesystem for your cluster.
- Under the
Data Repositoriestab, select thefsxfilesystem and clickExport to S3. Export can only currently be carried out back to the same s3 which was mounted to the fsx filesystem. - Specify the export path as
analysis_results(or be more specific to ananalysis_results/subdir), the path you enter is named relative to the mountpoint of the fsx filesystem on the cluster head and compute nodes, which is/fsx/. Start the export. This can take 10+ min. When complete, confirm the data is now visible in the s3 bucket which was exported to. Once you confirm the export was successful, you can delete the cluster (which will delete the fsx filesystem).
note: this will not modify/delete the s3 bucket mounted to the fsx filesystem, nor will it delete the policyARN, or private/public subnets used to config the ephemeral cluster.
the headnode /root volume and the fsx filesystem will be deleted if not explicitly flagged to be saved -- be sure you have exported Fsx->S3 before deleting the cluster
pcluster delete-cluster-instances -n <cluster-name> --region us-west-2
pcluster delete-cluster -n <cluster-name> --region us-west-2- You can monitor the status of the cluster deletion using
pcluster list-clusters --region us-west-2and/orpcluster describe-cluster -n <cluster-name> --region us-west-2. Deletion can take ~10min depending on the complexity of resources created and fsx filesystem size.
... For real, use it!
(also, can be done via pcui)
bin/daylily-ssh-into-headnode
alias it for your shell: alias goday="source ~/git_repos/daylily/bin/daylily-ssh-into-headnode"
- The AWS Cloudwatch console can be used to monitor the cluster, and the resources it is using. This is a good place to monitor the health of the cluster, and in particular the slurm and pcluster logs for the headnode and compute fleet.
- Navigate to your
cloudwatchconsole, then selectdashboardsand there will be a dashboard named for the name you used for the cluster. Follow this link (be sure you are in theus-west-2region) to see the logs and metrics for the cluster. - Reports are not automaticaly created for spot instances, but you may extend this base report as you like. This dashboard is automatically created by
pclusterfor each new cluster you create (and will be deleted when the cluster is deleted).
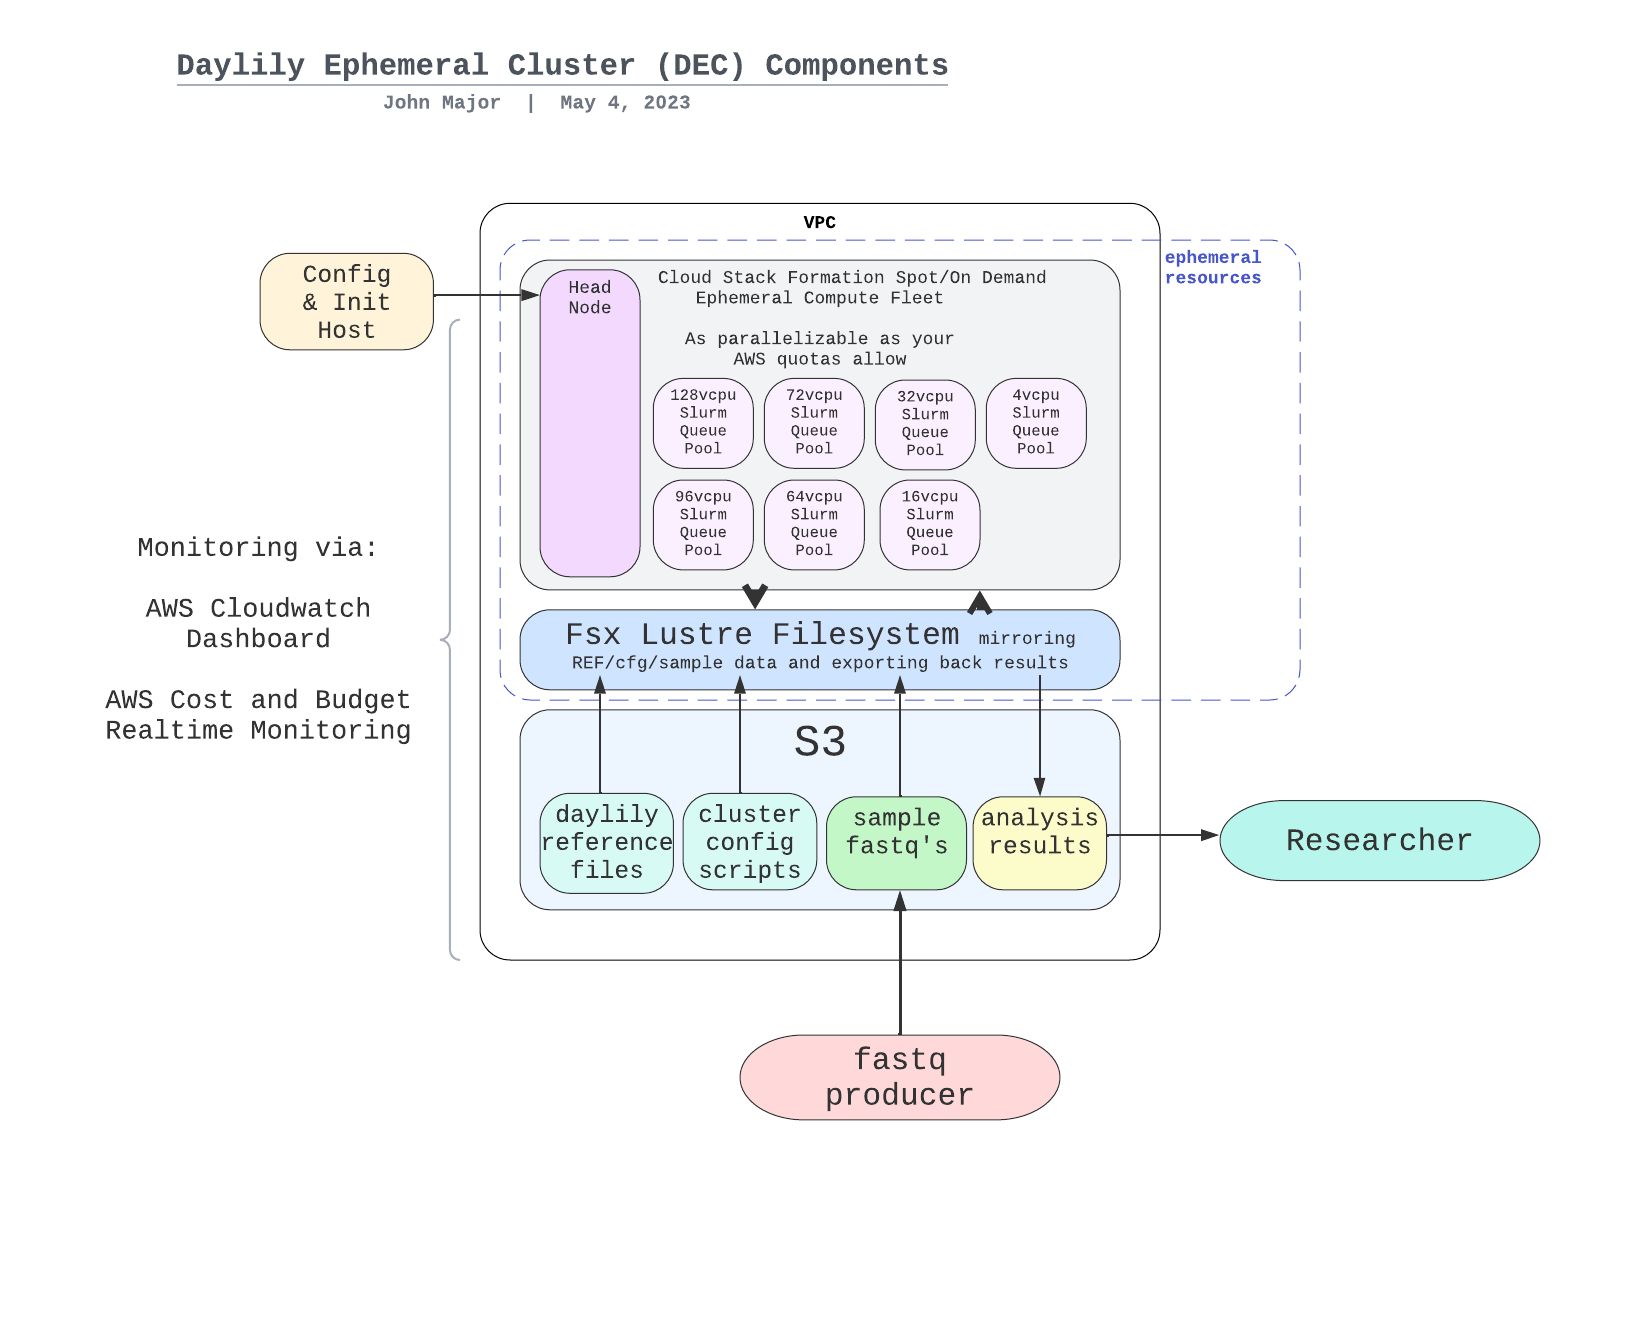
Daylily relies on a variety of pre-built reference data and resources to run. These are stored in the daylily-references-public bucket. You will need to clone this bucket to a new bucket in your account, once per region you intend to operate in.
This is a design choice based on leveraging the
FSXfilesystem to mount the data to the cluster nodes. Reference data in this S3 bucket are auto-mounted an available to the head and all compute nodes (Fsx supports 10's of thousands of concurrent connections), further, as analysis completes on the cluster, you can choose to reflect data back to this bucket (and then stage elsewhere). Having these references pre-arranged aids in reproducibility and allows for the cluster to be spun up and down with negligible time required to move / create refernce data.
BONUS: the 7 giab google brain 30x ILMN read sets are included with the bucket to standardize benchmarking and concordance testing.
You may add / edit (not advised) / remove data (say, if you never need one of the builds, or don't wish to use the GIAB reads) to suit your needs.
Onetime cost of between ~$27 to ~$108 per region to create bucket.
monthly S3 standard cost of ~$14/month to continue hosting it.
- Size: 617.2GB, and contains 599 files.
- Source bucket region:
us-west-2 - Cost to store S3 (standard: $14.20/month, IA: $7.72/month, Glacier: $2.47 to $0.61/month)
- Data transfer costs to clone source bucket
- within us-west-2: ~$3.40
- to other regions: ~$58.00
- Accelerated transfer is used for the largest files, and adds ~$24.00 w/in
us-west-2and ~$50 across regions. - Cloning w/in
us-west-2will take ~2hr, and to other regions ~7hrs. - Moving data between this bucket and the FSX filesystem and back is not charged by size, but by number of objects, at a cost of
$0.005 per 1,000 PUT. The cost to move 599 objecsts back and forth once to Fsx is$0.0025(you do pay for Fsx when it is running, which is only when you choose to run analysus).
- Your new bucket name needs to end in
-omics-analysis-REGIONand be unique to your account. - One bucket must be created per
REGIONyou intend to run in. - The reference data version is currently
0.7, and will be replicated correctly using the script below. - The total size of the bucket will be 779.1GB, and the cost of standard S3 storage will be ~$30/mo.
- Copying the daylily-references-public bucket will take ~7hrs using the script below.
hg38andb37reference data files (including supporting tool specific files).- 7 google-brain ~
30xIllunina 2x150fastq.gzfiles for all 7 GIAB samples (HG001,HG002,HG003,HG004,HG005,HG006,HG007). - snv and sv truth sets (
v4.2.1) for all 7 GIAB samples in bothb37andhg38. - A handful of pre-built conda environments and docker images (for demonstration purposes, you may choose to add to your own instance of this bucket to save on re-building envs on new eclusters).
- A handful of scripts and config necessary for the ephemeral cluster to run.
note: you can choose to eliminate the data for b37 or hg38 to save on storage costs. In addition, you may choose to eliminate the GIAB fastq files if you do not intend to run concordance or benchmarking tests (which is advised against as this framework was developed explicitly to facilitate these types of comparisons in an ongoing way).
See the secion on shared Fsx filesystem for more on hos this bucket interacts with these ephemeral cluster region specific S3 buckets.
.
├── cluster_boot_config  # used to configure the head and compute nodes in the ephemeral cluster, is not mounted to cluster nodes
└── data # this directory is mounted to the head and compute nodes under /fsx/data as READ-ONLY. Data added to the S3 bucket will become available to the fsx mount, but can not be written to via FSX
    ├── cached_envs
    │   ├── conda
    │   └── containers
    ├── genomic_data
    │   ├── organism_annotations
    │   │   └── H_sapiens
    │   │       ├── b37
    │   │       └── hg38
    │   ├── organism_reads
    │   │   └── H_sapiens
    │   │       └── giab
    │   └── organism_references
    │       └── H_sapiens
    │           ├── b37
    │           └── hg38
    └── tool_specific_resources
        └── verifybam2
            ├── exome
            └── test
Are region specific, and may only intereact with S3 buckets in the same region as the filesystem. There are region specific quotas to be aware of.
- Fsx filesystems are extraordinarily fast, massively scallable (both in IO operations as well as number of connections supported -- you will be hard pressed to stress this thing out until you have 10s of thousands of concurrent connected instances). It is also a pay-to-play product, and is only cost effective to run while in active use.
- Daylily uses a
scratchtype instance, which auto-mounts the region specifics3://PREFIX-omics-analysis-REGION/datadirectory to the fsx filesystem as/fsx/data./fsxis available to the head node and all compute nodes. - When you delete a cluster, the attached
Fsx Lustrefilesystem will be deleted as well. -
BE SURE YOU REFLECT ANALYSIS REUSLTS BACK TO S3 BEFORE DELETING YOUR EPHEMERAL CLUSTER ... do this via the Fsx dashboard and create a data export task to the same s3 bucket you used to seed the fsx filesystem ( you will probably wish to define exporting
analysis_results, which will export back tos3://PREFIX-omics-analysis-REGION/FSX-export-DATETIME/everything in/fsx/analysis_resultsto this new FSX-export directory. do not export the entire/fsxmount, this is not tested and might try to duplicate your reference data as well! ). This can take 10+ min to complete, and you can monitor the progress in the fsx dashboard & delete your cluster once the export is complete. - Fsx can only mount one s3 bucket at a time, the analysis_results data moved back to S3 via the export should be moved again to a final destination (w/in the same region ideally) for longer term storage.
- All of this handling of data is amendable to being automated, and if someone would like to add a cluster delete check which blocks deletion if there is unexported data still on /fsx, that would be awesome.
- Further, you may write to any path in
/fsxfrom any instance it is mounted to, except/fsx/datawhich is read only and will only update if data mounted from thes3://PREFIX-omics-analysis-REGION/datais added/deleted/updated (not advised).
The following directories are created and accessible via /fsx on the headnode and compute nodes.
/fsx/
├── analysis_results
│   ├── cromwell_executions  ## in development
│   ├── daylily   ## deprecated
│   └── ubuntu  ## <<<< run all analyses here <<<<
├── data  ## mounted to the s3 bucket PREFIX-omics-analysis-REGION/data
│   ├── cached_envs
│   ├── genomic_data
│   └── tool_specific_resources
├── miners  ## experimental & disabled by default
├── resources
│   └── environments  ## location of cached conda envs and docker images. so they are only created/pulled once per cluster lifetime.
├── scratch  ## scratch space for high IO tools
└── tmp ## tmp used by slurm by default
- I have a demo lisc, and old working workflows (but they are ~2yrs out of date at this point). I will be updating these workflows and including them in the benchmarking results.
- The aligner is already included, but I have not been running it as my $ resources are v. limited.
- Rough draft script is running already, with best guesses for things like compute time per-x coverage, etc.
- The
daylilyrepo grew from an analysis pipeline, and has co-mingled the ephmeral cluster infrastructure (which is not tied to any particular pipeline orchestrator). Breaking it into 2 parts will make things more modular and easier to maintain.
- A branch has been started for this work, which is reasonably straightforward. Tasks include:
- The AWS parallel cluster slurm snakemake executor, pcluster-slurm is written, but needs some additional features and to be tested at scale.
- Migrate from the current
daylilyanalysis_manifest.csvto the snakemakev8.*config/samples/unitsformat (which is much cleaner than the current manifest). - The actual workflow files should need very little tweaking.
- Running Cromwell WDL's is in early stages, and preliminary & still lightly documented work can be found here ( using the https://github.com/wustl-oncology as starting workflows ).
Before getting into the cool informatics business going on, there is a boatload of complex ops systems running to manage EC2 spot instances, navigate spot markets, as well as mechanisms to monitor and observe all aspects of this framework. AWS ParallelCluster is the glue holding everything together, and deserves special thanks.
The system is designed to be robust, secure, auditable, and should only take a matter of days to stand up. Please contact me for further details.
The DAG For 1 Sample Running Through The BWA-MEM2ert+Doppelmark+Deepvariant+Manta+TIDDIT+Dysgu+Svaba+QCforDays Pipeline
NOTE: each node in the below DAG is run as a self-contained job. Each job/n ode/rule is distributed to a suitable EC2 spot(or on demand if you prefer) instance to run. Each node is a packaged/containerized unit of work. This dag represents jobs running across sometimes thousands of instances at a time. Slurm and Snakemake manage all of the scaling, teardown, scheduling, recovery and general orchestration: cherry on top: killer observability & per project resource cost reporting and budget controls!

-
The above is actually a compressed view of the jobs managed for a sample moving through this pipeline. This view is of the dag which properly reflects parallelized jobs.


The batch is comprised of google-brain Novaseq 30x HG002 fastqs, and again downsampling to: 25,20,15,10,5x.
Example report.


- A visualization of just the directories (minus log dirs) created by daylily b37 shown, hg38 is supported as well

- [with files](docs/ops/tree_full.md
Reported faceted by: SNPts, SNPtv, INS>0-<51, DEL>0-51, Indel>0-<51. Generated when the correct info is set in the analysis_manifest.
Picture and list of tools


To make informed decisions about choosing an analysis pipeline, there are four key metrics to consider: accuracy(as generally measured via Fscore), user run time, cost of analysis and reproducibility. Further consideration should then be given to the longevity of results (how results are stored, costs associated with storage, and the ease of access to results). All of these can not be optimized simultaneously, and trade-offs must be made. Making these tradeoffs with intention is the primary goal of the daylily framework.
- what is the pipelines perofrmance?
- how long does it take to run the pipeline?
- is
- is
- is
- is
- is
- what is the asserted reproducibility of the pipeline? For 1 month? 1 year? 5 years? 20 years?
- And how is this tested?
- how are results stored? What are the costs and access mechanisms for these results?
To activate sentieon bwa and sentieon DNA scope, edit the config/day_profiles/{local,slurm}/templates/rule_config.yaml file to uncomment the following:
active_snv_callers:
    - deep
#    - sentd

active_aligners:
    - bwa2a:
        mkdup: dppl
#    - sent:  # uncomment to run aligner (same deduper must be used presently in all aligner outputs, unless bundled into the align rule)
#        mkdup: dppl  # One ddup'r per analysis run.  dppl and sent currently are active
#    - strobe:
- This will enable running these two tools. You will also need a liscence file from sentieon in order to run these tools.
- Please contact them to obtain a valid liscense .
- Once you have a lisence file, edit the
dyinitfile to include the /fsx/ relative path to this file whereexport SENTIEON_LICENSE=is found. - Save the liscence file in the each region specific S3 reference bucket, ie:
s3://PREFIX-omics-analysis-REGION/data/cached_envs/. When this bucket is mounted to the fsx filesystem, the liscence file will be available to all instances at/fsx/data/cached_envs/.
Daylily uses Semantic Versioning. For the versions available, see the tags on this repository.
If the S3 bucket mounted to the FSX filesystem is too large (the default bucket is close to too large), this can cause Fsx to fail to create in time for pcluster, and pcluster time out fails. The wait time for pcluster is configured to be much longer than default, but this can still be a difficult to identify reason for cluster creation failure. Probability for failure increases with S3 bucket size, and also if the imported directories are being changed during pcluster creation. Try again, try with a longer timeount, and try with a smaller bucket (ie: remove one of the human reference build data sets, or move to a different location in the bucket not imported by Fsx)
The command bin/init_cloudstackformation.sh ./config/day_cluster/pcluster_env.yml "$res_prefix" "$region_az" "$region" $AWS_PROFILE does not yet gracefully handle being run >1x per region. The yaml can be edited to create the correct scoped resources for running in >1 AZ in a region (this all works fine when running in 1AZ in >1 regions), or you can manually create the pub/private subnets, etc for running in multiple AZs in a region. The fix is not difficult, but is not yet automated.
Is largely in your hands. AWS Parallel Cluster is as secure or insecure as you set it up to be. https://docs.aws.amazon.com/parallelcluster/v2/ug/security-compliance-validation.html
daylib: python library code. and: ...
named in honor of Margaret Oakley Dahoff
Z a A